Show Space
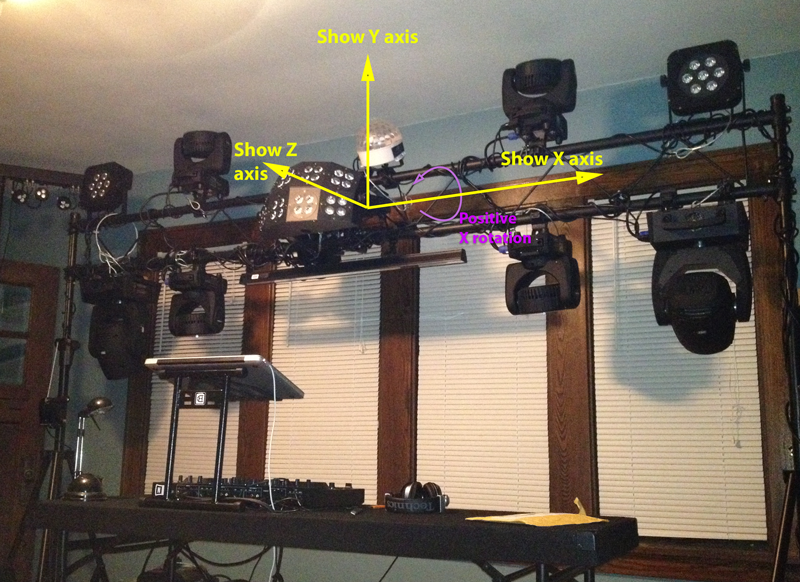
In order to be able to create spatial effects, from lighting gradients spread across your grid, to aiming moving heads in a precise and coordinated way with respect to each other or people or objects near them, Afterglow needs to know where everything is, and how it is oriented in space. This means you need to be able to specify these things. When mounting a fixture, you specify where it is and where it is facing. When creating a direction or aim cue, you specify a direction for lights to face, or a point for them to aim at. In order to be able to communicate such concepts, Afterglow has a standard frame of reference for the light show. The entire show has an origin, the zero point for the three spatial axes, which you decide on before you start patching fixtures, and an orientation, which is expressed in terms of the origin. The afterglow show orientation is chosen to make it easy to think in terms of the way effects will look for the audience. As shown in the diagram below, in the standard orientation, the X axis extends directly to the right of the origin. That is to say, X coordinates are zero at the origin, increase as you move to the right, and decrease as you move to the left. The Y axis extends straight up; Y coordinates grow from zero as you move up from the show origin, and decrease as you move down. The Z axis extends directly towards the audience, increasing in that direction from zero at the origin, decreasing as you move towards the back of the show.
Distance units are in meters, but if you find it easier to measure
inches or feet, you can call
afterglow.transform/inches
and
afterglow.transform/feet
to convert them to meters for you.
To express rotations, the same frame of reference is used. If a light
has been hung upside down compared to its standard orientation (which
should be documented in the fixture
definition), you need to account for that when calling
show/patch-fixture.
Rotations are expressed in terms of the axes as well. For example, if
a fixture has been tumbled towards the audience by a quarter rotation,
that would be a rotation around the X axis of π/2. (Rotations are
expressed in radians, a complete rotation being 2π. Again, if you find
it more convenient to work in degrees, you can call
afterglow.transform/degrees
to convert them into radians for you.) To figure out which direction
of rotation is positive, imagine you are standing looking towards the
origin on the axis in question, so its arrowhead is pointing at your
nose. From that perspective, a positive rotation is counter-clockwise,
and a negative rotation is clockwise, as shown by the purple arc in
the figure above.
When measuring these distances and angles you don’t need to worry about getting things perfect down to the millimeter, pretty close is good enough, but the closer you can get, the more precisely Afterglow will be able to aim at things and coordinate looks for you.
When it comes to picking your origin, it is up to you. Picking the center of your lighting grid makes conceptual sense, although if you want to make it easy to create aiming effects that hit particular spots on the floor, having the Y axis start at floor level is handy. That is what I have found most convenient in setting up shows so far: my X and Z origins are in the center of the lighting rig, and Y is 0 at the floor.