Cues
Cues are designed to support creating user interfaces for controlling
effects. They provide a convenient way to organize, identify, trigger,
adjust, and monitor effects. Each show
in Afterglow maintains a cue grid, which can be viewed and interacted
with through the embedded web interface and
MIDI controller mapping implementations which can be
registered
as grid controllers, like the Ableton Push and
Novation Launchpad family.
The Cue Grid
The cue grid is a two dimensional arrangement of cues, where the
bottom left corner is assigned coordinates (0, 0). X coordinates
increase from left to right, and Y coordinates increase from bottom to
top. The web interface and registered grid controllers display 64 cues
at a time in an 8×8 grid, and can be scrolled around that grid.
The user can configue (“link”) the web interface to track
the scroll position of a registered grid controller. When that is
done, scrolling either interface will cause the other to scroll in the
same way, so the browser window can act as documentation to help the
user learn the cue names associated with each available cue pad on the
controller.
In addition to names, cues can be assigned colors in the grid, and the
web interface will honor those colors, as will the physical grid
controllers, within the limits of their capabilities. To provide
feedback about cue activation, a lightened version of the cue color is
displayed for cues which are currently active. And to help inform the
user about cue compatibility, any cues which would cause a running
effect to end (either because they are assigned the same effect
keyword, or they mention that keyword in their :end-keys list) will
be displayed in a darkened color.
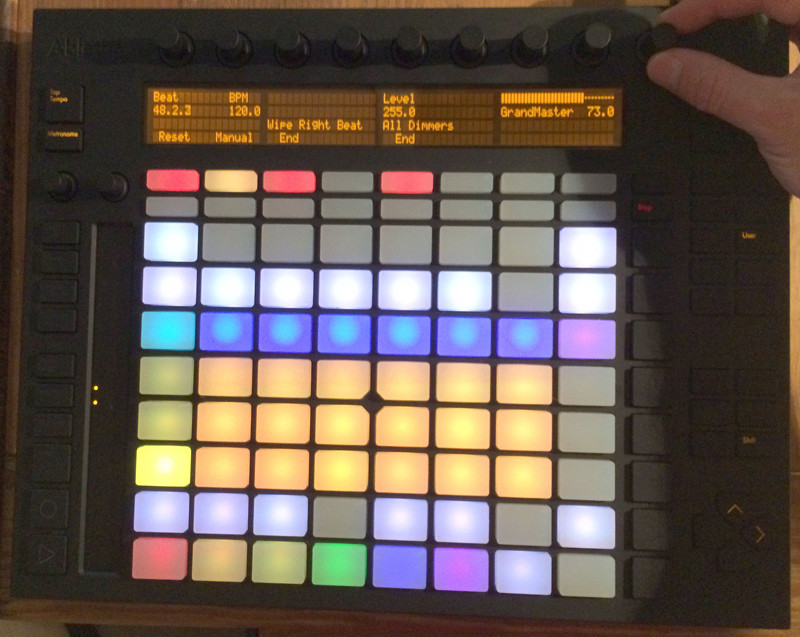
Examples of these features can be seen in the animation above, in which the first two rows of color cues are all mutually exclusive, while the four rows of dimmer cues above them have a more complex interrelationship: The “All Dimmers” cues in the leftmost column darken the entire rectangle of dimmer cues, while individual fixture dimmer cues to their right darken their just their own columns as well as the "all" cues. On the blue/green page of Torrent gobo cues, you can see how each gobo wheel cue dims other cues which use the same fixture and gobo wheel while it is active.
This is a useful technique for building easy-to-learn cue grids. A slightly older version of the same cues are shown on the Ableton Push below, so you can see how the color relationships help with learning the cue names.
To trigger a cue, simply press the corresponding pad on a physical interface, or click within the grid cell in the web interface. The effect associated with the cue will be created and added to the show, and the grid cell will be lightened to indicate that the cue’s effect is running. If the cue ends itself after a period, the grid interface will be updated to reflect that as well.
To end a cue’s effect before it would naturally end (or because it is open-ended and does not end until asked to), simply press the pad corresponding to the running cue (or, again, click the grid cell in the web interface). The effect will be asked to end. Some effects end instantly, which will be refleced by the cue grid cell returning to its normal color. Some effects have a delayed ending, so they can fade out, or finish some musically relevant sequence. If this is happening, the grid cell will blink while the effect ends, and then stay at its normal color once the effect finishes ending. If you want the effect to end immediately you can press the pad one more time while the effect is performing its gradual ending, and it will be killed at that point, regardless of how much longer it was planning to run.
Cues can also be created which run only as long as the
corresponding controller pad is held down (this is done by passing a
true value with the :held optional keyword argument when creating
the cue). This is often done for intense effects like strobes.
Cues can also offer pressure sensitivity on controllers which support
this (like the Ableton Push and Novation Launchpad Pro). For such
cues, one or more variable used by the cue can be updated by the
strike and aftertouch pressure exerted by the operator as they hold
down the pad. This can make for very expressive effects, as
exemplified by the Sparkle cue set up early in the examples
namespace’s
make-cues function,
and its strobe
cues. Of course, this pressure sensitivity is not possible with the
web cue grid.
The interface for moving around the cue grid is the diamond of arrows at the bottom right of both the web interface and the Ableton Push. If there are more cues available in a particular direction, that arrow is lit, otherwise it is dark. For the cues pictured above, the bottom left corner of the cue grid is being displayed, and there are more cues above and to the right, so the up and right scroll arrows are lit. Pressing an arrow scrolls to the next set of eight rows or columns in that direction. (And if the web view is linked to a grid controller, pressing the arrow on either will scroll both. For physical grid controllers which lack scroll buttons, linking them to the web interface is the most practical way of scrolling them.)
Cues can also be triggered from simpler MIDI controllers (which
don’t register as grid controllers) by explicitly mapping notes
or control changes sent by the controller to cues within the grid
using
afterglow.effects.cues/add-midi-to-cue-mapping.
Regardless of the mechanism by which a cue is triggered, the web
interface, a registered grid controller, or an explicitly mapped MIDI
note or control change, feedback will be sent to all interfaces so the
status of the cue will be represented consistently on all of them. And
a cue triggered on one controller can be ended on any other controller
by simply pressing the lit button or clicking the lit cell there.
For example, to be able to trigger the Sparkle cue, which the examples
namespace places at (0, 7) within the sample show cue grid, by
pressing the bottom leftmost button on my inexpensive Korg nanoKontrol
2 MIDI controller, after using
afterglow.midi/identify-mapping
to determine that the button sends control-change messages for
controller number 43, I can simply evaluate:
(cues/add-midi-to-cue-mapping "nano" 0 :control 43 0 7)Now I can press the top-left pad on the Push, click the top left cell in the Web interface, or press that button on the nanoKontrol, and the Sparkle cue lights up on all three interfaces, and the effect runs and sparkles the lights.
|
In order to enable Afterglow to send feedback about cue status to the lights on the nanoKontrol I needed to use the Korg Kontrol Editor to set its LED Mode to External (as shipped, they were in Internal mode, and lit themselves when held down). Most MIDI controllers are likely to need similar configuration to work as feedback-capable cue controllers with Afterglow, but most I have seen do offer configuration tools to enable this kind of external control. |
Creating Cues
The afterglow.effects.cues
namespace provides functions for creating cues. Unsurprisingly, the
cue function creates a
cue. At its most basic, you pass in two parameters, show-key which
is the keyword that will be used to add the cue’s effect to the show
when the cue is triggered, ending any other effect running under that
same keyword, and effect-fn, which is a function that will be called
when the cue is triggered, and whose responsibility is to create and
return the effect that the cue should add to the show. This is done so
that a fresh instance of the effect is used each time the cue is
triggered, in case the effect is complex and maintains its own state.
effect-fn will be passed a map containing any
cue-specific variable bindings.
For the very common case of wanting to create a cue to activate
a fixture-specific function (capability), and perhaps adjust the
function’s activation level while it runs, you can instead call the
special-purpose function-cue described
below.
|
There are a number of optional keyword parameters which can be used to modify the cue that is created. Remember that you can also consult the API documentation for another explanation of these functions, and for links to examine the source code, which is the most authoritative explanation of how they work, and can offer inspiration for variations that you might want to create yourself.
| Parameter | Default | Purpose | ||
|---|---|---|---|---|
|
effect name |
Sets the text to be displayed for the cue in the web cue grid, and in
the text display of the controller (if it has one) when the cue is
running. If you don’t supply a short name, the name of the
effect created by the |
||
|
white |
Sets the color of the cue within the grid for hinting about its purpose and relatedness to other cues, to help operators learn and understand the interface. If not specified, white is used. |
||
|
none |
Specifies a function to call to obtain the current color to use for
the cue within the grid, so that an dynamic/animated color can provide
even more intense hinting about its purpose and relatedness to other
cues, to help operators learn and understand the interface. If not
specified, the static value specified by The function provided will be called whenever the grid interface is
being updated, and will be called with four arguments: the Helper functions exist to create cue color functions for commonly
useful situations.
|
||
|
none |
A list of keywords that identify additional effects to be ended when
launching this cue. See the dimmer cue section of
|
||
|
|
Sets the effect priority used when adding the cue’s effect to the
show. This can be used to make sure the effect runs before or after
other effects in the rendering loop. Effects
are run in order, and later effects can modify or override the results
of earlier ones, like the way the Sparkle effect in
|
||
|
|
As described above, causes the cue’s effect to run only
as long as the corresponding controller button or pad is held down, if
the controller supports that capability. All current controller
implementations, including the web interface, the
Ableton Push mapping, and mappings to generic MIDI
controllers created using
Show operators can override the |
||
|
none |
Specifies a sequence of show variable bindings that can be used by
the cue’s effect. Each variable specification is a map, whose content
is described in the following table. These specifications are used to
create any necessary new variables, and a |
||
|
none |
A visualizer creation function that will be called by controllers
with animated graphical displays like the Push 2. It will be passed
two arguments, the cue’s When supplied, this function will be used to create a moving strip chart of the cue’s activity around the current moment on the display. The example dimmer oscillator cues like make-sawtooth-dimmer-cue show how this can be used effectively. 
|
The ability to create animated cue colors in a grid controller
interface via the :color-fn key described above can come in handy
when there are a lot of cues and you want some to stand out to the
operator, but there are contexts in which it might be gratuitous or
distracting; the example strobe and rainbow-shifting cues provided
with Afterglow might tend toward that extreme. So you don’t need to
use it, but you can if it makes sense.
It is hard to argue against the usefulness of a dynamic color that is
tied to a show variable, however, like the :strobe-color example, or
even a cue parameter, like the example global color cues, because this
approach updates the grid controller interface to reflect a color
chosen by the user, and so provides valuable information in a
non-distracting way.
Cue Variables
As noted above, a cue can contain a map under the key :variables
which assigns variables to the cue. These variables allow the cue to
be adjusted by the show operator in convenient and powerful ways,
either through the interfaces automatically presented by the Effect
Control sections of the embedded Web
interface or Ableton Push mapping,
through velocity-sensitive grid controllers like the Push or
Launchpad Pro, or a binding to
any
velocity-sensitive MIDI controller.
Cue Variables can either be numeric (adjusted by sliders in the web UI, or rotary encoders and faders on MIDI controllers), boolean (with corresponding simple Web and Push interfaces) or they can store colors, in which case both the web UI and Push mapping provide a powerful interface for picking and adjusting the color.
They can also be temporary, lasting only the duration of the cue, or tied to a show variable, so they can be shared between cues, and have values which last between activations of the cue. Color variables which are stored as show variables can be adjusted by any MIDI controller.
| Key | Default | Purpose |
|---|---|---|
|
n/a |
Identifies the variable that is being bound to the cue. This can
either be a keyword, and refer to an existing show variable (set
using
|
|
|
When not If the value of |
|
variable name |
Provides a name to identify the variable in the web interface and in
the text area of physical controllers which provide a labeled
interface for adjusting running effects, like the Ableton Push. If no
name is supplied, the name of the value passed with |
|
none |
If present, gives a shorter version of |
|
|
Specifies the smallest value that the variable can be adjusted to, for interfaces which support adjustment of cue variables while the cue is running. If not supplied, the minimum value will be zero. |
|
|
Specifies the largest value that the variable can be adjusted to, for interfaces which support adjustment of cue variables while the cue is running. If not supplied, the maximum value will be one hundred. |
|
|
Provides a hint for how the variable should be formatted in
adjustment interfaces. Supported values are |
|
|
Requests that variable adjustment interfaces which draw a graphical representation of the current value within its range display this variable as a deviation from a central value, rather than something growing from the left, if they have such options. |
|
varies |
Specifies the smallest amount by which the variable should be
adjusted when the user is turning a continuous encoder knob. If not
specified, the controller implementation gets to decide what to do.
The recommended default resolution is no larger then 1/256 of the
range from |
|
|
If present, with a true value, requests that the variable value be adjusted by strike and aftertouch pressure while the operator is holding down the button or pad which launched the cue, on controllers which have pressure sensitivity. |
|
|
If present (and |
|
|
If present (and |
Using Cue Variables
The purpose of cue variables is to define a user interface for the show operator, either in the web interface, or on a rich MIDI controller like the Ableton Push. The web UI and controller implementations look at the variable specifications as you have set them up, and build interface elements accordingly when the cue is running. The running effect looks up the variable values when it needs them, and adjusts itself appropriately.
If the cue is configured to use any temporary variables (which are
indicated by using strings rather than keywords for their :key
entry), the effect needs to know how to look them up. That’s the
purpose of the var-map argument which gets passed to effect-fn. It
contains a mapping from the keyword version of the temporary
variable’s name to the actual keyword of the temporary variable that
was created to hold its value for the duration of the cue.
For example, a cue with a temporary variable named "color", defined by
including :key "color" in the cue variable specification, might be
assigned a temporary variable with the actual name
:cue-3-9-temp-color. The var-map passed to effect-fn would have
an entry :color :cue-3-9-temp-color to let it know about this
assignment. So effect-fn can find the actual variable keyword to use
for its effects that want to access its :color variable by looking
up that keyword in var-map
(:color var-map)The above function call would return :cue-3-9-temp-color in this
example scenario.
There are many examples of cues using permanent and temporary
variables in the afterglow.examples namespace. Several of them take
advantage of the helper function
apply-merging-var-map
which provides a very convenient shortcut: If the effect that you want
to call makes use of keyword arguments, name your temporary cue
variables the same as those keyword arguments, and you can then simply
use apply-merging-var-map to build the function call to the effect,
passing in the cue variables (and their values) as the keyword
arguments and values that configure the effect.
A Cue Example
As a simple illustration, here is how to wrap the blue and red scene
from the Multiple Colors example into a
cue, and add it to the show grid, so it can be started and stopped
from a grid controller or the web interface. This cue has no
variables, so the effect-creation function ignores its argument (this
is reflected by using the conventional Clojure “don’t care” name for
it, _, rather than var-map):
(ct/set-cue! (:cue-grid *show*) 0 17
  (cues/cue :color  (fn [_]
                      (afterglow.effects/scene
                        "Blue and red 2"
                        (afterglow.effects.color/color-effect
                          "Plain red" (create-color "red") (show/fixtures-named "odd"))
                        (afterglow.effects.color/color-effect
                          "Plain Blue" (create-color "blue") (show/fixtures-named "even"))))))
Creating Function Cues
Often you want a cue to activate a specific feature of a fixture
(often described as a function in the fixture manual, and in the
fixture definition within Afterglow, which can unfortunately get
confusing when we are talking about invoking Clojure functions). To
make it easy to work with such fixture capabilities, the
afterglow.effects.cues namespace also offers the
function-cue
function. It is quite similar to the cue function described
above, but it takes care of creating the effect
for you, given the function name you want to apply to a fixture or set
of fixtures. You can even apply the function to fixtures from
different manufactures, regardless of whether they implement it on
different channels and with different value ranges. If it has been
assigned the same function name (such as, for example, :strobe),
Afterglow will find it in each fixture definition, and send the right
values to each fixture.
| Function cues are able to figure out how to do the right thing for each fixture because they can scan the fixture definitions for Function Specifications matching the keyword you gave when creating the cue. When you patch a fixture into a show, Afterglow indexes its function ranges in order to make this efficient. |
function-cue also automatically creates a temporary cue-local
variable for adjusting the function
level if the function is not fixed over its range. This makes it
essentially a one-liner to create a button in your cue grid which
activates a function and then, via the web interface or if your
controller supports it, lets you tweak that function while is running.
Examples include the Torrent gobo, focus, and prism cues created by
make-cues.
Minimally, function-cue requires three parameters: show-key which
is the keyword that will be used to add the cue’s effect to the show
when the cue is triggered, ending any other effect running under that
same keyword, function, which is the keyword identifying the
fixture-specific capability that you want the cue to activate and
control, as defined in the fixture definition, and fixtures, which
is the list of fixtures or heads that you want the cue to affect.
(Only fixtures and heads which actually support the specified function
will be affected by the cue.)
There are a number of optional keyword parameters which can be used to modify the cue that is created, and are described below. See the API documentation for more details.
| Parameter | Default | Purpose | ||
|---|---|---|---|---|
|
function name |
Sets the name to assign the effect created by the cue. If none is
provided, the name of the |
||
|
none |
Can be used to provide a shorter name to be displayed for the cue in the web cue grid, and in the text display of the controller (if it has one) when the cue is running. |
||
|
white |
Sets the color of the cue within the grid for hinting about its purpose and relatedness to other cues, to help operators learn and understand the interface. If not specified, white is used. |
||
|
none |
Specifies a function to call to obtain the current color to use for
the cue within the grid, so that an dynamic/animated color can provide
even more intense hinting about its purpose and relatedness to other
cues, to help operators learn and understand the interface. If not
specified, the static value specified by The function provided will be called whenever the grid interface is
being updated, and will be called with four arguments: the Helper functions exist to create cue color functions for commonly
useful situations.
|
||
|
|
If provided, and the function supports a range of values with
different meanings (such as a focus range, movement speed, or the
like), sets the initial level to assign the function, and to the
variable which will be introduced to allow the function value to be
adjusted while the cue runs. Functions with no variable effect will
ignore |
||
|
|
If supplied along with a true value, causes the effect that is created for this cue to operate with highest-takes-precedence rules with respect to any other effect which has already assigned a value for this function. Otherwise, the effect will simply discard any previous assignments, replacing them with its own regardless of their value. |
||
|
none |
A list of keywords that identify additional effects to be ended when
launching this cue. See the dimmer cue section of
|
||
|
|
Sets the effect priority used when adding the cue’s effect to the
show. This can be used to make sure the effect runs before or after
other effects in the rendering loop. Effects
are run in order, and later effects can modify or override the results
of earlier ones, like the way the Sparkle effect in
|
||
|
|
As described above, causes the cue’s effect
to run only as long as the corresponding controller button or pad is
held down, if the controller supports that capability. All current
controller implementations, including the web interface, the
Ableton Push mapping, and mappings to
generic MIDI controllers created using
Show operators can override the |
||
|
|
If present, with a true value, requests that the function value be adjusted by MIDI velocity and aftertouch pressure while the operator is holding down the button or pad which launched the cue, on controllers which have pressure sensitivity. |
||
|
|
If present (and |
||
|
|
If present (and |
Creating Code Cues
It can be convenient to use a cue grid to trigger arbitrary actions
which have nothing directly to do with lighting effects. For example,
if your grid controller doesn’t have a dedicated button for resetting
the show metronome, you might want to use one of the cue grid cells
for that purpose. The
code-cue
function makes this easy. It creates a cue that does nothing other
than call the function you supply, one time, when the cue is launched.
Your function must take two arguments, because it will be called with
the show and metronome snapshot when the cue starts. The function must
also return right away, since it’s run as part of the effect rendering
pipeline. If you need to do something that could take a while, you
will need to do that on a different thread.
Your function is passed as the first argument to code-cue, and you
must also supply a string as the second argument; this will be used to
label the cue when it is assigned to a cue grid with text
capabilities, to identify its purpose.
As with other cues, you can also provide an optional keyword argument
:color along with a color specification, to request that the cue
grid use that color for the cell holding this cue.
The cue will be configured to end when you let go of the cue pad, because it doesn’t do anything after calling your function once when it is first launched.
As a concrete example, here is how to create a code cue that restarts the show metronome when it is launched:
(ct/set-cue! (:cue-grid *show*) 0 0
             (cues/code-cue (fn [show snapshot]
                              (rhythm/metro-start (:metronome show) 1))
                            "Reset"))
Controlling Cues
The afterglow.controllers
namespace defines some helpful functions for working with cues, and
defines a grid
controller protocol which rich controller mappings, like the ones for
the Ableton Push and Novation
Launchpad family, use to attach themselves to a running show, and
synchronize with the web interface.
If you are implementing a new grid controller mapping, you will want to study that protocol, and will likely find the Novation Launchpad family and Ableton Push mappings to be useful examples and starting points for your own work. (And please, when you are done, submit a pull request to add your implementation to Afterglow!)
When you are setting up the cue grid for your show, you will use
set-cue!
to arrange the cues you want it to contain. The
make-cues
function in the examples namespace contains a lot of examples of doing
this. As cues are added to the grid, its dimensions are updated, and
the web interfaces and any registered grid controllers will
immediately reflect the new cue and dimensions.
You can remove a cue from the grid with
clear-cue.