MIDI Mapping and Beat Sync
Afterglow is designed to work with MIDI controllers and DJ equipment. You can bind physical controller elements to trigger cues and adjust show variables, and sync the BPM of the show master metronome to MIDI clock pulses from a DJ controller or mixer. (Although if you have professional Pioneer gear, you are better off syncing the metronome to the Pro DJ Link via an Ethernet cable.)
These examples assume you are in a Clojure REPL with Afterglow loaded,
in the namespace afterglow.examples. This is the default namespace you
get if you check out the project and run lein repl. The sample show is
assumed to be running; if not, (show/start!)
|
Mapping Cues to a Controller
Although the most convenient and powerful way of running cues with Afterglow is to use a large grid controller with color feedback (like the Ableton Push or Novation Launchpad Pro, which can mirror the cue grid of the web interface) you can still accomplish a great deal with a simple controller with a few buttons. You will still want to start by creating the cues in the show cue grid, not only so you can see and manipulate them with the web interface, but also because that is how they can be mapped to MIDI controllers. (The rich Push and Launchpad family mappings are described in detail on their own pages.)
First you need to identify the MIDI messages that the controller sends
when you press and release the interface element you want to assign
the cue. Afterglow can help with that too, as described
below. Once you have the cue created and
the control identified, you can create the mapping using
afterglow.effects.cues/add-midi-to-cue-mapping, like:
(cues/add-midi-to-cue-mapping "nano" 0 :control 46 0 6)This would cause Afterglow to start or stop the cue at grid position (0, 6) when a pad on the device named "nano" is pressed and sends a MIDI control change message on control number 46. See the documentation for details on all the arguments.
If the controller has LEDs associated with the controls, and you
can configure it so that its LEDs are in external control mode,
Afterglow will even give you feedback about when the cue is running,
by lighting up the pad or button when the cue starts (whether or not
you started it using this controller), and darkening it when the cue
ends. If you are unable to configure your controller in this way, or
there is some other reason why you want to avoid having Afterglow send
it MIDI messages about the cue status, pass the additional arguments
:feedback-on false to add-midi-to-cue-mapping. See the
function
documentation
for full details.
|
If you want to be able to later remove this cue mapping, be sure to
save the value returned by add-midi-to-cue-mapping in a
variable, because you will need to pass it to
remove-midi-to-cue-mapping.
Or you can simply disconnect the controller from your system, and
Afterglow will clean up any mappings that had been assigned to it.
Also be sure to see the section below that explains how you can arrange to have afterglow automatically call the relevant MIDI mapping functions to set up your device whenever it is connected.
If you are mapping a cue that is set up with velocity sensitive
variables, and your controller is not actually velocity-sensitive, you
might find the cue being activated more intensely than you like,
because the controller is always sending maximum velocity values when
pressed. You can work around this by passing the optional
:use-veolocity argument along with an explicit velocity value from
0 to 127 to add-midi-to-cue-mapping. This will cause the
mapping to act as if the button was pressed with the velocity you
specified here, allowing you to choose the values with which the cue
gets activated.
|
Mapping a Control to a Variable
You can also tie an encoder or fader on a MIDI control surface to a show variable, so that turning the encoder or sliding the fader changes the value of the variable. If you have set up cues to look at that variable, through cue-specific variable bindings, the control surface can then vary the look of the effect created by the cue, both before the cue is launched, and while it is running.
Here is a lower-level example of how I can use
add-midi-control-to-var-mapping
have a knob on one of my
simple MIDI controllers set the hue of all the lights. It shows up
with a MIDI port name of SLIDER/KNOB, and its first rotary
controller is control 16 on channel 0. I can map that to set a show
variable knob-1 to the values 0-360 (the legal hue values):
(show/add-midi-control-to-var-mapping "Slider" 0 16 :knob-1 :max 360)| See the documentation for details about all the arguments. Also, if you want to map a color component like this, there is a better way to do it that makes it easier to work with the color in the web interface. |
Then I can create a global color effect based on that variable:
(show/add-effect! :color (global-color-effect
  (params/build-color-param :s 100 :l 50 :h :knob-1)))
It is also possible to perform arbitrary transformation of the MIDI
value before storing it into the show variable, by passing
add-midi-control-to-var-mapping a transformation function using the
optional keyword argument :transform-fn. The function you supply
will called with the MIDI value (already scaled, if you passed a value
with :min or :max), and whatever it returns will be stored in the
variable. Your function can contain whatever logic it needs, and does
not even need to return a number. As a simple example, suppose you
want to set up a :beat-ratio variable for configuring oscillators,
and you want it to have the value 1, 2, 4, or 8, depending on how far
a fader is raised. Since those are all powers of two, you could
implement the varible binding like this:
(show/add-midi-control-to-var-mapping
  "SLIDER" 0 1 :beat-ratio :max 3
  :transform-fn (fn [v] (Math/pow 2 (Math/round v))))
This intercepts any MIDI control-change messages for the device
whose name or description contains "SLIDER", on channel 0, controller
number 1. It scales the incoming control value to the range 0 through
3, then calls a custom function which rounds the scaled value to the
nearest integer, and raises 2 to that power. The result gets stored
into the show variable :beat-ratio.
|
If you want to be able to later remove this variable mapping, be sure
to save the value returned by add-midi-control-to-var-mapping in a
variable, because you will need to pass it to
remove-control-mapping.
Or you can simply disconnect the controller from your system, and
Afterglow will clean up any mappings that had been assigned to it.
Also be sure to see the section below that explains how you can arrange to have afterglow automatically call the relevant MIDI mapping functions to set up your device whenever it is connected.
Finding Mapping Details
In the all-too likely event you don’t have all your MIDI port names and control channel and note numbers memorized, Afterglow can help. Just run…
(afterglow.midi/identify-mapping)…then twiddle the knob, slide the fader, or press the button you wish to map. Afterglow will report the first control-change or note message it receives:
{:command :control-change, :channel 0, :note 32, :velocity 127,
 :device {:name "SLIDER/KNOB",
          :description "nanoKONTROL2 SLIDER/KNOB"}}
Notice that even for control changes, the controller number is identified as
:note(32 in this example).
If nothing is received for ten seconds, it will give up:
nilIf this happens, and you are sure the device is connected, you will need to troubleshoot your MIDI setup. If you are on a Mac, and the device was not connected when you started Afterglow, be sure that you have installed CoreMIDI4J as discussed on the Afterglow Wiki.
| These examples show how to perform low-level MIDI mapping. Over time, you might find that someone has written a rich user interface binding for your controller, as has been done for the Ableton Push, which would let you jump right in without having to worry about such details. These examples can still help explain how your controller’s binding works, or encourage you to write and share a binding for a new controller that you happen to have. |
Automatically Creating Bindings When a Device Connects
You can tell Afterglow to watch for a particular device to be connected and call a function whenever it is present. This function can set up all of the MIDI bindings you want for that device. This is convenient because if the device is not there, nothing will happen (and there will be no errors), but if it is, the bindings will be set up. Even more importantly, in a performance context, if the device is accidentally disconnected or powered down, the bindings will be reconfigured as soon as it is reconnected.
To do this, set up a function like map-nano in the example below
which creates all the MIDI bindings you want for your device, and then
call
afterglow.midi/watch-for
to cause that function to be called whenever a device with a matching
name or description is connected:
(defn map-nano []
  (cues/add-midi-to-cue-mapping "nano" 0 :control 46 0 6)
  (show/add-midi-control-to-var-mapping "nano" 0 16 :knob-1 :max 360))

(afterglow.midi/watch-for "nano" map-nano)
If you want to be able to cancel the watcher later, be sure to
save the value returned by watch-for in a variable. The return value
is a function which cancels that watcher when you call it.
|
See the watch-for
documentation
for details about other ways you can configure it, such as adjusting
how long it waits for the new device to stabilize before calling your
function, and how to provide another function that gets called to
clean up when the device is disconnected. You do not need to worry
about cleaning up ordinary MIDI bindings, since Afterglow
automatically does that whenever a device is disconnected, but if you
have set up any of your own state that you would like to remove, you
can use this mechanism to do so.
Mapping a Control to a Color Component
When you are working with colors for cues, Afterglow lets you put a color object in a show variable or cue parameter, rather than simply storing individual numeric components like the hue. Doing this lets the web and Ableton Push interfaces give the user a rich color picker interface for adjusting that variable or parameter, so it is usually a better approach than just storing the numbers that make up the color.
When you do that, you can still use any MIDI controller to adjust
components of that color, using
afterglow.controllers.color/add-midi-control-to-color-mapping.
Here is an example of how to tie the left six faders on one of my
simple MIDI controllers to adjust all of the components that make up
the color used by the sample show’s strobe effects. The controller
shows up with a MIDI port name of SLIDER/KNOB, and its fader
controllers are controls 0 through 7 on channel 0. Assigning the
first six to adjust components of the strobe color looks like:
(require '[afterglow.controllers.color :as color-ctl])
(color-ctl/add-midi-control-to-color-mapping "SLIDER" 0 0 :strobe-color :red)
(color-ctl/add-midi-control-to-color-mapping "SLIDER" 0 1 :strobe-color :green)
(color-ctl/add-midi-control-to-color-mapping "SLIDER" 0 2 :strobe-color :blue)
(color-ctl/add-midi-control-to-color-mapping "SLIDER" 0 3 :strobe-color :hue)
(color-ctl/add-midi-control-to-color-mapping "SLIDER" 0 4 :strobe-color :saturation)
(color-ctl/add-midi-control-to-color-mapping "SLIDER" 0 5 :strobe-color :lightness)
See the
documentation
for details about all the arguments; this simple example assumes you
want to access the full range of each color component and that higher
MIDI values should map to higher color values. Also, even though it is
included here for completeness, there is no point in assigning a value
to the :strobe-color variable’s :lightness component, since that
is under the control of the strobe cue.
|
With this done, as I move the sliders on this MIDI controller, I can see the colors of the strobe cues in the web interface and on the Ableton Push and Novation Launchpad grids changing (and on the lights themselves if any strobe cue is running at the time).
Mapping a Control to a Dimmer Master
The web interface and Ableton Push mapping have dedicated interfaces
for controlling the show’s dimmer grand master, but you can map any
MIDI controller fader or rotary controller to it, or to any other
dimmer master that you have created to control your cues, using
add-midi-control-to-master-mapping.
Here is an example of how to tie the leftmost fader on one of my
simple MIDI controllers to the show’s dimmer grand master. The
controller shows up with a MIDI port name of SLIDER/KNOB, and its
first fader controller is control 0 on channel 0. I can map that to
set the show grand master to the values 0-100 (the legal dimmer master
values) by simply calling:
(show/add-midi-control-to-master-mapping "Slider" 0 0)
See the
documentation
for details about all the arguments; this simple call takes advantage
of the fact that the show dimmer grand master is the default master if
you don’t pass one in with :master.
|
Mapping Metronome Control
The rich grid controller bindings created for the Ableton Push and Novation Launch Pad provide very convenient metronome control using Tap Tempo buttons that flash on each beat of the show metronome, and respond to taps appropriately for any metronome synchronization (as described in the next sections) the show may have established.
Even if you don’t have such a controller, you can set up a button or
pad on any MIDI controller you own to work the same way. Simply
identify the mapping you need to interact
with that button or pad as decribed above, then call
afterglow.controllers.tempo/add-midi-control-to-tempo-mapping
to set it up.
As with cue mappings, these mappings work best if you can
configure your controller so that its LEDs are in external control
mode (instead of local control mode), so that Afterglow is completely
in control of when they are lit. If you can’t do that, of there is
some other reason why you want to avoid having Afterglow send MIDI
messages to try to control the LEDs, you can pass the additional
arguments :feedback-on false when setting up the mappings. Of course
this will mean that the Tap Tempo button can’t blink on beat for you.
|
For example, to set this up for the Record button on a Korg nanoKONTROL2 controller, you can call:
(def tempo-map
  (afterglow.controllers.tempo/add-midi-control-to-tempo-mapping
    "nano" 0 :control 45))
See the documentation for details about all the arguments.
From that point on, the Record button blinks on each beat of the show metronome, and when you press the button, it adjusts the tempo of the show. Assuming you have no metronone synchronization established for the show, tapping the button aligns the metronome to a beat, and if you tap it three or more times within two seconds of each preceding tap, sets the metronome’s BPM. Tap it as you hear each beat of the music, and after three or more taps, the speed of the metronome will be approximately synchronized with the music.
| To synchronize bars, see the discussion about how to pair this mapping with a shift button, coming up shortly. Also, because of the two second threshold, you can’t tap tempos that are 30 BPM or less. |
If the metronome’s BPM is already being synced automatically, via MIDI clock messages as described in the next section, then tapping the button will not change the BPM. Instead, it acts as a Tap Beat button, always moving the start of the current beat to match when you tapped the button.
If the metronome’s BPM and beat positions are both being synced automatically, either via the Traktor beat phase mapping or Pioneer Pro DJ Link (as described further below) then tapping the button acts as a Tap Bar button, telling Afterglow that the moment when you tapped the button is the down beat (the first beat of the current bar).
In addition to Tap Tempo buttons, the grid controllers have Shift buttons which modify the behavior of other buttons, including the Tap Tempo button. That can be very convenient, especially when you are not synced to a beat grid from Pioneer DJ Link Pro or Traktor, so you want to be able to set the tempo, the beat location, and the down beat. You can set up another button on your controller to act this way and work with your Tap Tempo button, but you need to map it before mapping the Tap Tempo button, so you can make use of it in setting up the Tap Tempo mapping.
To set up a Shift button on any MIDI controller you happen to have,
start by identifying the mapping you need
to interact with the button or pad you want to use, then call
afterglow.controllers.tempo/add-midi-control-to-shift-mapping
to set it up.
For example, to set this up for the Play button on a Korg nanoKONTROL2 controller, you can call:
(def shift-map
  (afterglow.controllers.tempo/add-midi-control-to-shift-mapping
    "nano" 0 :control 41))
See the documentation for details about all the arguments.
Once you’ve done that, when you hold down that button Afterglow lights it up, and when you release it Afterglow darkens it. But more importantly, you can use the value it returned to set up a relationship between your Shift button and a Tap Tempo button:
(def tempo-map
  (afterglow.controllers.tempo/add-midi-control-to-tempo-mapping
    "nano" 0 :control 45 :shift-fn (:state shift-map)))
This tells Afterglow to check the state of your Shift button whenever you it your Tap Tempo button. If the Shift button is not held down, the Tap Tempo button acts as described above, but if your Shift button is being held down, tempo taps act differently, synchronizing at one level higher.
So if your show metronome is unsynchronized, and the Tap Tempo button would normally align the beat or set the BPM, or if it is synchronized to MIDI clock and the button always simply aligns the beat, then tapping it while holding down your Shift key makes it act as a Tap Bar button, telling Afterglow that the moment when you tapped the button is the down beat (the first beat of a bar).
If the BPM and beat positions are both already being synced automatically, so the button would normally act as a Tap Bar button, then with Shift down it acts as a Tap Phrase button, telling Afterglow that the closest beat to when you tapped the button is the start of an entire phrase.
If you ever want to stop using the mapped buttons, there is a function to remove MIDI mappings. This would undo what we did above:
(afterglow.midi/remove-control-mapping "nano" 0 :control 45 tempo-map)
(afterglow.midi/remove-control-mapping "nano" 0 :control 41 shift-map)
Simply detaching the MIDI controller also automatically removes any mappings that were created for it.
Syncing to MIDI Clock
Many DJ mixers automatically send MIDI clock pulses to help synchronize to their BPM. Pioneer’s Nexus mixers send MIDI clock over both their physical MIDI connection, and over USB if you are connected that way, conveniently. But they offer far more useful sync information over the Ethernet port via Pro DJ Link packets, which Afterglow can also process.
If you are using a mixer or DJ software like Traktor which supports only MIDI clock sync, it is a lot better than nothing! Here is how to take advantage of it.
| Native Instruments has an informative Knowledge Base article which explains how to configure Traktor to send the MIDI clock pulses that Afterglow can sync to. Also see below for how to sync to the actual beat phase information when you are using Traktor. |
Once you have your MIDI clock pulses reaching the system on which Afterglow is running, start Afterglow. Because of limitations inherent in the Java MIDI API, only MIDI devices which were connected when the program started are available to it. Then, assuming you have only one device sending MIDI clock, you can just execute:
(show/sync-to-external-clock (afterglow.midi/sync-to-midi-clock))If there is ambiguity about which device’s MIDI clocks you want to process, Afterglow will complain. Resolve that by passing a device filter which matches the device you want to use. The simplest kind of filter you can pass is a string, which uniquely matches the name or description of the MIDI device that you want to sync to:
(show/sync-to-external-clock
  (afterglow.midi/sync-to-midi-clock "traktor"))
The documentation for
afterglow.midi/filter-devices
explains the other kinds of device filter you can use.
| This section describes the low-level mechanisms available for establishing MIDI sync from code and the REPL. A much easier way is to just click the Sync button in the Metronome section at the bottom of the embedded Web interface. |
From then on, as the BPM of that device changes, Afterglow will track it automatically. To check on the sync status, you can invoke:
(show/sync-status)
; -> {:type :midi, :status "Running, clock pulse buffer is full."}
The calculated BPM of the synced show can be displayed like this:
(metro-bpm (:metronome sample-show))
; -> 128.5046728971963
It will bounce up and down near the actual BPM as clock pulses are received, but overall track the beat quite well. To get a rock-solid beat lock you need to have equipment that can provide Pro DJ Link syncing, as described below.
To shut down the syncing, just call sync-to-external-clock with no
sync source:
(show/sync-to-external-clock)
(show/sync-status)
; -> {:type :manual}
Syncing to Traktor Beat Phase
If you are using Traktor as your source of MIDI clock synchronization, even though you cannot quite attain the kind of smoothly precise BPM lock as you can with Pro DJ Link, you can configure Traktor to send its beat phase information in a way that Afterglow can detect and analyze, giving you the same kind of beat grid synchronization.
In order to do that, download and unzip the Afterglow Traktor Controller Mapping, Afterglow.tsi, and import it into Traktor.
Be sure to use the following steps to import the mapping,
which will add it to any other mappings or settings you have already
set up in Traktor. If you instead use the obvious and tempting
Import button at the bottom of the Preferences window, you will
replace—rather than add to—your settings.
|
-
Open the Traktor Preferences.
-
Choose the
Controller Managersection from the menu down the right. -
Click the
Add…button in theDevice Setupsection at the top: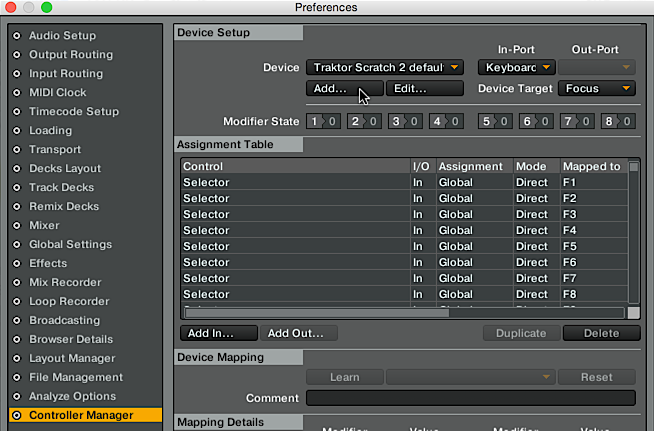
-
Choose
Import TSIin the menu which pops up, andImport Other…at the bottom of the menu which that opens: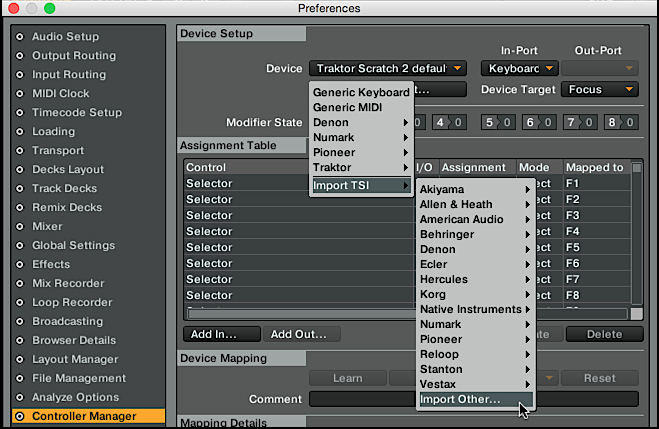
-
Navigate to the folder containing the
Afterglow.tsifile you downloaded, and open it.
Following this procedure will create a Device named Clock,
Afterglow within the Traktor Controller Manager:

Select and use that rather than the Generic MIDI device you would create in the process described in the Traktor Knowledge Base article linked above, and in addition to sending basic MIDI clock mesages, Traktor will send special MIDI messages that Afterglow will recognize and use to remain synchronized to the Traktor beat grid.
|
In order to avoid extra MIDI clock pulses being sent, which will cause the BPM calculations to be wildly incorrect, make sure not to create more than one Generic MIDI device on the Traktor Virtual Output port. If you created one following the directions in the Syncing to MIDI Clock section above, be sure to delete it, and leave only the Afterglow Traktor controller mapping. You must still follow the instructions in the Traktor
Knowledge
Base article, starting with step 3.2, to ensure that the |
The way the Afterglow mapping works is that it sends out Control
Change messages for all currently playing decks. These messages
communicate the current beat phase on that deck. (Deck A is sent as
controller 1, B as controller 2, C as controller 3, and D as
controller 4). In order for Afterglow to know which deck to pay
attention to if more than one is playing at the same time, whenever a
different deck becomes the Tempo Master, a message identifying the new
Master deck is sent out as a Control Change message on controller 0.
(The same number to deck correspondence is used.) When no deck is
Tempo Master, a Control Change with value 0 is sent on controller
0.
Whenever Afterglow detects a coordinated stream of messages on
controllers 0 through 4 which are consistent with beat-phase
information from this Traktor mapping, it offers that MIDI input
device as a source of Traktor beat-phase synchronization, and if it is
synchronizing a metronome with the MIDI
clock messages on that port, will also synchronize the beats.
Syncing to Pro DJ Link
If you are working with Pioneer club gear, such as the Nexus line of CDJs and mixers, you can use Pro DJ Link to sync much more precisely. You just need to be on the same LAN as the gear (most easily by connecting an Ethernet cable between your laptop running Afterglow and the mixer, or a hub or router connected to the mixer. You don’t need to be connected to the Internet, the protocol works fine over self-assigned IP addresses. You just need to specify which device you want to use as the source of beat information, and that will generally be the mixer, since it will track whichever device is currently the tempo master (or perform BPM analysis if a non-DJ-Link, or even non-digital, source is being played). Like with MIDI sync, you can give a unique substring of the device name in the sync call:
(show/sync-to-external-clock
  (afterglow.dj-link/sync-to-dj-link "DJM-2000"))
As with MIDI, you can check on the sync status:
(show/sync-status)
; -> {:type :dj-link, :status "Running, 5 beats received."}
; -> {:type :dj-link,
; :status "Network problems? No DJ Link packets received."}| If you are not getting any packets, you will need to put on your network troubleshooting hat, and figure out why UDP broadcast packets to port 50001 from the mixer are not making it to the machine running Afterglow. |
Sending MIDI Over a Network
You can sync MIDI clock and respond to MIDI controller messages from
hardware and software which is not directly attached to the machine
running Afterglow. If you are on a Mac, this capability is built in,
and can be configured using the
Audio
MIDI Setup utility (in the Utilities subfolder of your
Applications folder). For Windows, you can install the excellent,
free, and fully compatible
rtpMIDI driver.
Either of these approaches allow you to communicate with the network
MIDI capabilities built in to iOS devices and applications.
If you are interested in using Open Sound Control (OSC) control surfaces with Afterglow, you should also check out the free TouchOSC package (also available for Android). The TouchOSC site also has a nice illustrated walk-through of setting up network MIDI communication.
Connecting to MIDI Ports on the Same Machine
To achive MIDI routing on a single machine, you need to set up a virtual MIDI bus. On the Mac you can use Core MIDI’s built-in IAC bus, and on Windows you could use the MIDI Yoke utility. You can find a good tutorial about the needed steps on the Ableton Live website.
Checking your Sync
An easy way to see how well your show is syncing the beat is to use the
metronome-effect, which flashes a bright pink pulse on the down beat, and a
less bright yellow pulse on all other beats of the show metronome. To
set that up:
(require 'afterglow.effects.fun)
(show/add-effect! :color
  (afterglow.effects.fun/metronome-effect (show/all-fixtures)))
Then you can reset the metronome by hitting Return on the following command, right on the down beat of a track playing through your synchronized gear, and watch how Afterglow tracks tempo changes made by the DJ from then on:
(metro-start (:metronome sample-show) 1)When running live light shows you will almost certainly want to map a button on a MIDI controller to perform this beat resynchronization (although it is not necessary when you are using Pro DJ Link to synchronize with your mixer—but even then you will likely want the next two functions mapped, for realigning on bars and phrases). Here is how I do it for one of the buttons on my Korg nanoKontrol 2:
(show/add-midi-control-metronome-reset-mapping "slider" 0 45)Then, whenever I press that button, the metronome is started at beat 1, bar 1, phrase 1.
You can add mappings to reset metronomes which are stored in show variables by adding the variable name as an additional parameter at the end of this function call.
As noted above, even when you have a rock solid beat sync with your
mixer, you sometimes want to adjust when bars or phrases begin,
especially when tricky mixing has been taking place. You can accomplish
this by mapping other buttons with
add-midi-control-metronome-align-bar-mapping and
add-midi-control-metronome-align-phrase-mapping. These cause the MIDI
control to call metro-bar-start and metro-phrase-start on the
associated metronome to restart the current bar or phrase on the nearest
beat, without moving the beat. This means you do not need to be as
precise in your timing with these functions, so you can stay beat-locked
with your synch mechanism, much like the “beat jump” feature in modern
DJ software.
If the metronome flashes start driving you crazy, you can switch back to a static cue,
(show/add-effect! :color blue-effect)or even black things out:
(show/clear-effects!)Open Sound Control
Afterglow also embeds osc-clj so
you can bind cues and variables to be controlled via Open Sound
Control (OSC), using tools like hexler.net’s
TouchOSC. The sample show in the
afterglow.examples namespace uses this capability to offer wireless
graphical X-Y-Z aiming of groups of moving heads:
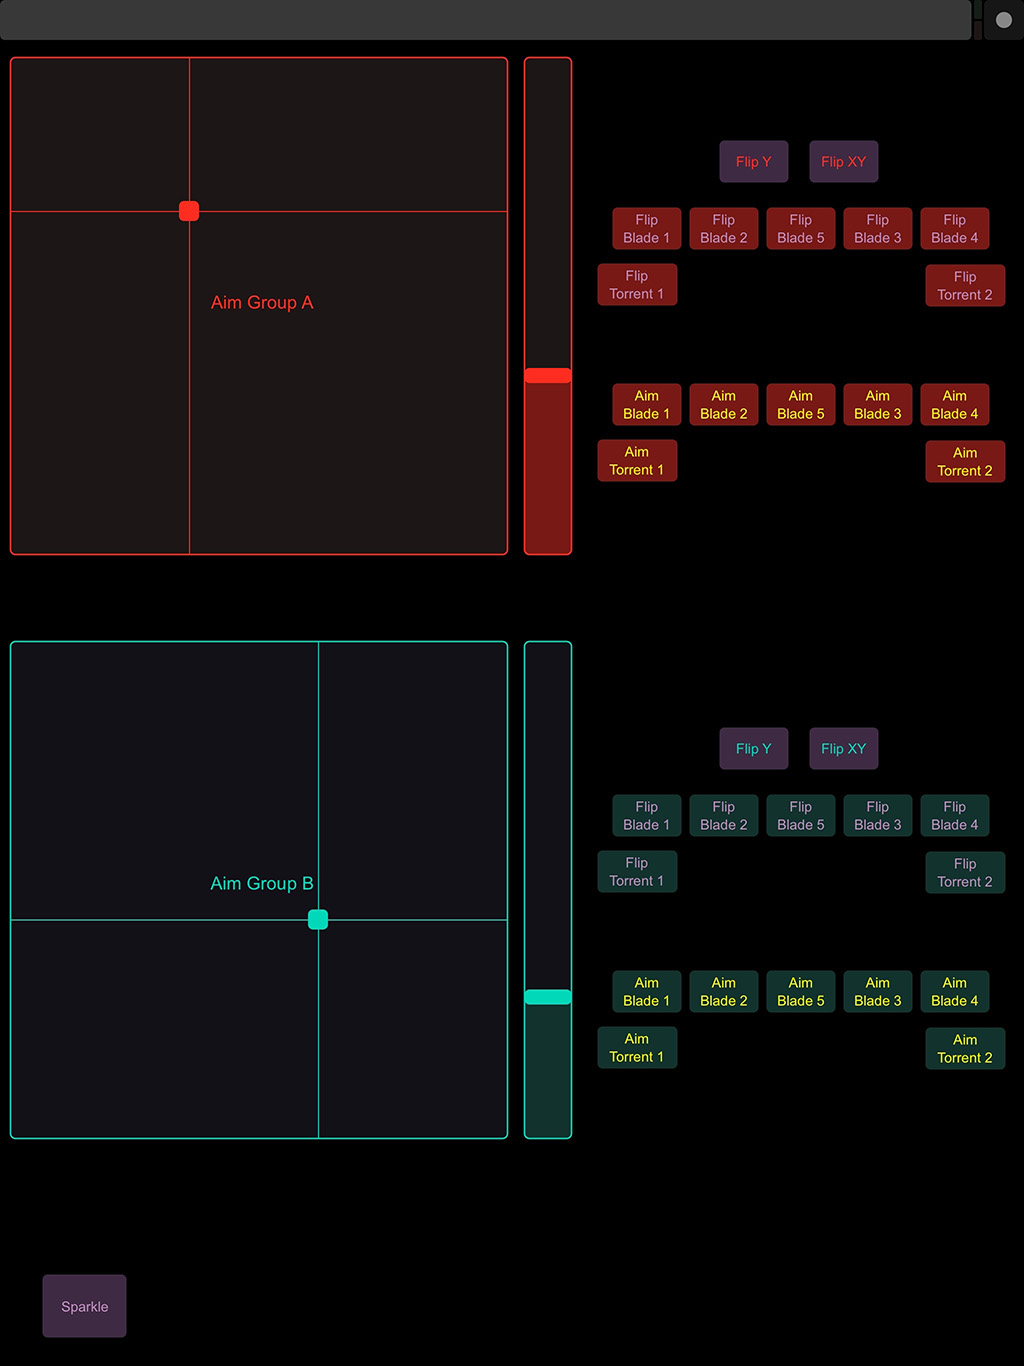
The functions
add-osc-cue-binding and
add-osc-var-binding, and
the ones near them in the namespace, show how this was done. They seem
to work well enough that they will be fleshed out a bit and moved into
a new OSC-support namespace in a future release of Afterglow. But for
now, you can use them and tweak them as they are.
Rich Grid Controller Mappings
Afterglow ships with built-in mappings that take advantage of several excellent grid controllers. If you happen to own one, you are in luck! And if you don’t, reading about these capabilities may tempt you to buy one, or write a mapping for one that you own that is not yet supported.
Using Ableton Push
Perhaps the best way to control Afterglow is using the fluid, tactile interface offered by the Ableton Push. There’s enough to say about that now that it has been moved to its own page.
Using the Novation Launchpad Family
Novation also makes a great line of grid controllers, some of which offer touch-sensitivity as well. Even though they lack built-in text and graphical displays (at least so far), Afterglow uses them well enough that they get their own page.
Setting Up Grid Controller Bindings
When you set up the sample show by calling (use-sample-show) in the
afterglow.examples namespace, it configures Afterglow to
automatically use any compatible grid controller as soon as it is
detected in the MIDI environment. Here is a closer look at how it
accomplishes that. It uses the
auto-bind
function in the afterglow.controllers namespace:
(require '[afterglow.controllers :as ct])
(ct/auto-bind *show*)
When you want to shut down the bindings running on all connected controllers, you can call:
(ct/deactivate-all)You can also undo the binding of any controller by simply disconnecting it or powering it down; Afterglow will gracefully stop using it when that happens.
Both of the above approaches leave the auto-binding mechanism active, though. So if you attach a new controller, or disconnect (or turn off) one of the controllers that you just deactivated, then reconnect it (or turn it back on), it will get bound again. To stop that from happening, you can call:
(ct/cancel-auto-bind)From that point on, controllers will be ignored as they come and go
until you reactivate the auto-bind system. As described in the
API documentation,
there are optional parameters you can give to auto-bind to adjust
things like the refresh rate used by the controllers, or to only
auto-bind to certain controllers. For example, if you only want to
auto-bind to Push, you could call:
(ct/auto-bind *show* :device-filter "Ableton Push")Similarly, to only bind to Launchpad Pro, you could use a
:device-filter value of "Launchpad Pro" (or "Launchpad Mk2",
"Launchpad Mini", or "Launchpad S"), or to bind to any member of
the Launchpad family, just "Launchpad".
Whenever you call auto-bind it cancels whatever previous auto-bind
configuration had been set up, and applies your new arguments.
If you don’t want to turn on auto-binding at all but simply want to
set up a one-time binding to a controller that is already connected,
you can call
afterglow.controllers/bind-to-show.
That function always expects you to pass a device filter as its second
argument, and then accepts the same kinds of optional keyword
arguments that auto-bind does. It will try to bind to first device
matching the device-filter argument you supplied, so that needs to
be the correct port on a device like the Push or launchpad Pro which
has multiple MIDI ports. That means that to successfully bind to a
Push or Launchpad Pro, you need calls like these:
(def push (ct/bind-to-show *show* "User Port"))
(def launchpad-pro (ct/bind-to-show *show* "Standalone Port"))
That finds the User Port on the Push, and the Standalone Port on the Launchpad Pro, which are the ports that Afterglow needs to use to communicate successfully with them. Simpler controllers like the Launchpad Mk2, Mini, and S have only one port, so you can use the name of the device itself as your device filter.
If a compatible controller can’t be immediately found at the
first port that matches your device filter, bind-to-show will fail.
There are more sophisticated ways of building device filters than
simply using strings; see the
afterglow.midi/filter-devices
documentation for details.
|
The example calls stored the results of calling bind-to-show in
variables, which is useful because you can later use those variables
to individually shut down the resulting bindings:
(ct/deactivate push)
(ct/deactivate launchpad-pro)
Of course, if you don’t care about that and simply want to deactivate
all bindings, you can still use (ct/deactivate-all) as described
above. Or you can just turn off or unplug the controllers. Since
auto-binding is not active, that will permanently remove them from
Afterglow’s control (at least until you explicitly re-bind them).