Using the Novation Launchpad Family
Novation makes an entire family of grid controllers which can all be used with Afterglow, with differing capabilities. The most powerful is the Launchpad Pro, with pressure-sensitive RGB pads.
Binding to a Launchpad
Assuming you have a Launchpad family controller connected to the machine running Afterglow, Afterglow will find and activate it as soon as you have set up the sample show. You will see a brief startup animation, and Afterglow’s appropriate Launchpad interface will start.
| For information about how to set up bindings without the sample show, or more details about how it works, see Setting Up Grid Controller Bindings. |
Using Launchpad Pro
With its pressure-sensitive, RGB-capable 8×8 pad grid, the Novation Launchpad Pro makes an excellent grid controller for Afterglow, and has its own custom mapping.
There are also mappings for the Launchpad Mk2, Launchpad Mini, and Launchpad S
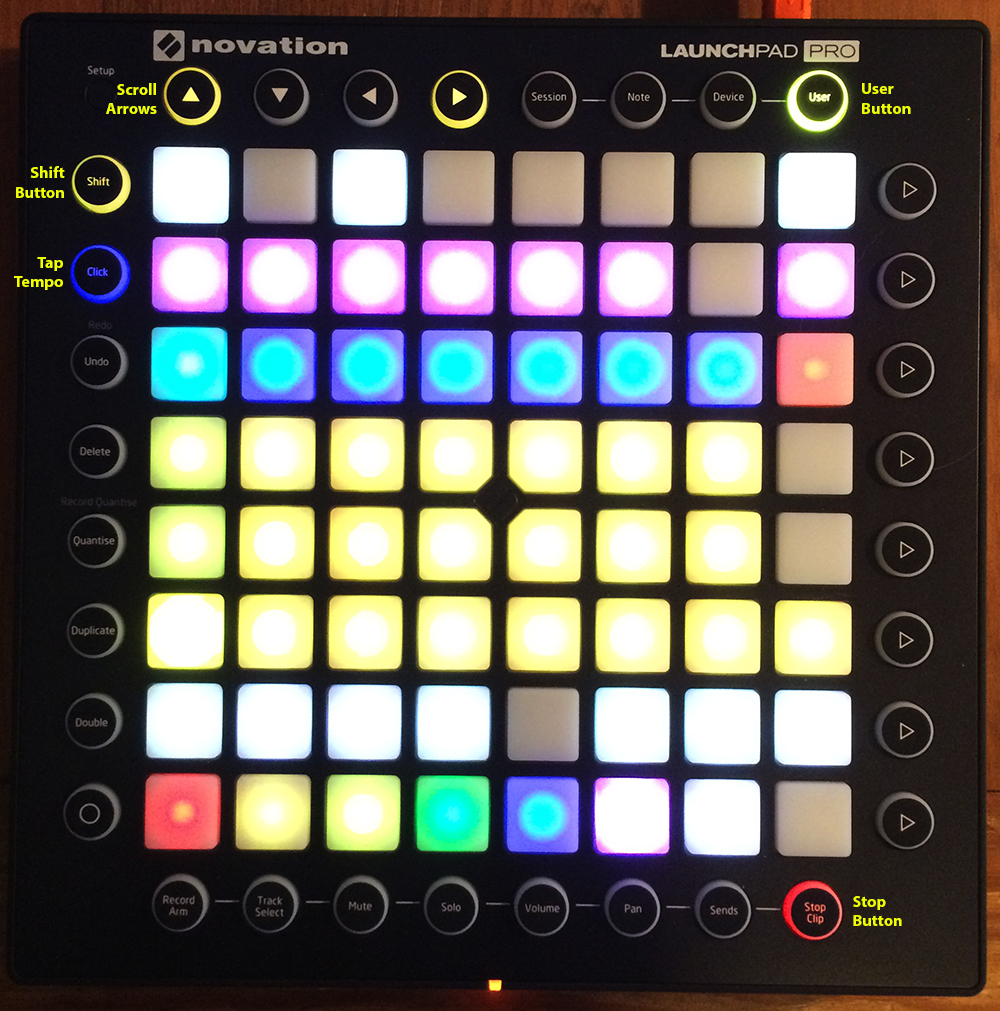
Here is what the Launchpad Pro interface looks like:
Show Control
Once you have the Launchpad linked to a show, it becomes a helpful way to monitor and control the cues and manage the musical synchronization of the show.
The red Stop button at the bottom can be used to stop a running show, which will suspend the processing of its effects, and black out all universes assigned to the show. The button will be illuminated brightly while the show is stopped. Pressing it again will restart the show where it would have been had it not stopped, and dim the button again.
Most of the space on the interface is dedicated to an 8×8 grid of color coded cue trigger pads, which provide a window onto the show’s overall cue grid. The Launchpad can be linked to the web interface so that both always display the same section of the cue grid, and the web interface can remind you of the names of the cues you are looking at, or it can be scrolled independently, allowing you access to more cues at the same time.
| If you have more than one compatible grid controller, you can have Afterglow using all of them at the same time; each can be scrolled to different areas of the cue grid, and each can even be linked to a different browser window if you have that much screen space. |
You can activate any cue shown by pressing its pad; running cues will light up, and darken again when they end. If the cues are configured to respond to velocity, you can adjust the corresponding variables by how hard you are pressing on the pad while the cue is running.
To stop a running cue, press its pad again. Some cues will end immediately, others will continue to run until they reach what they feel is an appropriate stopping point. While they are in the process of ending, the cue pad will blink. If you want the cue to end immediately even though it would otherwise run for a while longer, you can press the blinking cue pad again and it will be killed right then.
The colors assigned to cue pads by the creator of the cue grid are intended to help identify related cues. Some cues (especially intense ones like strobes) are configured to run only as long as they are held down. In that case, when you press cue pad, it lights up with a whitened version of the cue color as a hint that this is happening, and as soon as you release the pad, the cue will end. If you want to override this behavior, you can hold down the Shift button (towards the top left of the Launchpad Pro) as you press the cue pad, and it will activate as a normal cue, staying on until you press it a second time.
As noted above, cues can also be configured to take advantage of the
pressure sensitivity of the Launchpad Pro cue pads, so that as you
vary the pressure with which you are holding down the pad, some
visible variable of the cue is altered. The strobe and sparkle cues
in created by
afterglow.examples/make-cues
for the sample show work this way: the intensity and lightness of the
strobe are increased by pressure, and so is the chance that a sparkle
will be assigned to a light on each frame.
| In order for aftertouch to work with your cues—in other words, for you to be able to adjust cue variables by varing pressure on the pad after you have launched it—you need to set your Launchpad Pro’s Aftertouch mode to Polyphonic, as described in the Setup Button section of the User Guide. You might also want to set the Aftertouch Threshold to Low. |
Cues may be mutually exclusive by nature, and if they were created to
reflect this (by using the same keyword to register their effects with
the show, or specifying other effect keys in their :end-keys list),
when you activate one, the other cues which use the same keyword are
dimmed. This is a hint that when you activate one of them, it will
replace the others, rather than running at the same time. (There are
photos demonstrating this effect on the
Ableton Push page.)
Scrolling
The show will likely have many more cues than fit on the pad grid; the row of arrow buttons at the top left allow you to page through the larger show grid. If there are more cues available in a given direction, that arrow will be lit, otherwise it is dark. Pressing an active arrow scrolls the view one “page” in that direction. In the photo below, it is currently possible to scroll down and to the left:
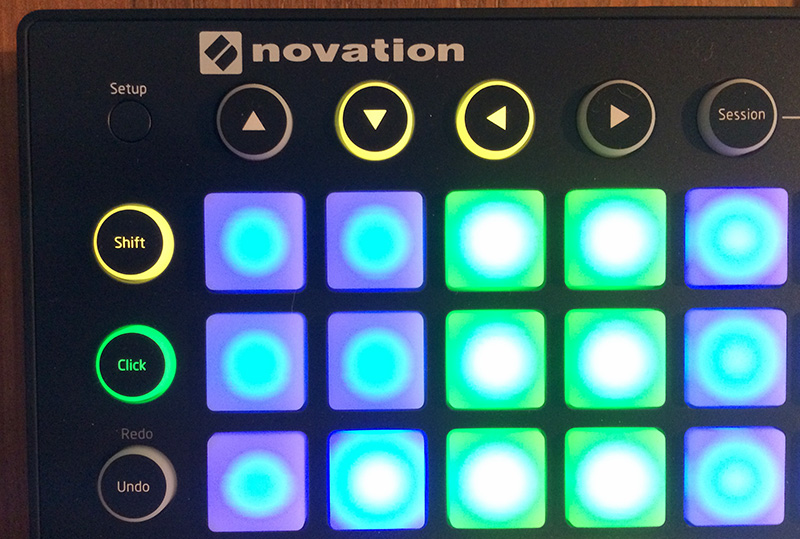
If you hold down the Shift button, the arrows will scroll you as far as possible in the direction that you press.
Metronome Control
The Click button lets you monitor and adjust the Metronome that the show is using to keep time with the music that is being played. Since Afterglow’s effects are generally defined with respect to the metronome, it is important to keep it synchronized with the music. The Click button label flashes at each beat, and the color of the button tells you whether the metronome is syncronized to an external source. If it is blue, as in the first photo in this section, the tempo is being set manually. If green, as is shown right above, then tempo is being driven by an external source, such as MIDI or DJ Link Pro. If the button is red, it means that Afterglow was configured to sync to some external source, but has lost contact with it.
The most basic way of synchronizing the metronome is to tap the Click button at each beat of the music. Tapping the button aligns the metronome to a beat, and if you tap it three or more times within two seconds of each preceding tap, sets the metronome’s BPM. Tap it as you hear each beat of the music, and after three or more taps, the speed of the metronome will be approximately synchronized with the music.
Once the tempo is correct, you can tell Afterglow which beat is the down beat by holding down the Shift button while pressing Click. This combination does not change the tempo, but tells Afterglow that the moment when you tapped the button is the down beat (the first beat of a bar).
Trying to keep up with tempo changes during dynamic shows can be tedious, so you will hopefully be able to take advantage of Afterglow’s metronome synchronization features. If the DJ can send you MIDI clock pulses, or you can connect via a Local Area Network to Pioneer professional DJ gear to lock into the beat grid established by Pro DJ Link, Afterglow can keep the BPM (with MIDI) and even the beats (with Pro DJ Link and the Traktor Afterglow Beat Phase controller mapping) synchronized for you. You can use the web interface to configure metronome sync.
Once your sync is established, the meaning of the Click button changes. If you are using MIDI clock to sync the BPM, it becomes a Tap Beat button, which simply establishes where the beat falls. If you are locked in to a Pro DJ Link beat grid or using the Traktor beat phase mapping, the beats are automatically aligned for you so, it becomes a Tap Bar button which, when pressed, indicates that the current beat is the down beat (start) of a bar. In these sync modes you can also use the Shift button to align at the next bigger boundary: If tapping Click would normally move the bar, shift-tapping will move the phrase.
Sharing the Launchpad Pro
If you are using Afterglow at the same time as Ableton Live, you can switch back and forth between which has control of the Launchpad Pro by pressing the User button. If Live is not running when you press User, the Launchpad interface will simply go blank (except for the User button itself), until you press it again, at which point Afterglow will light it up.
| Future releases may take advantage of more of the buttons on the controller. |
Using Launchpad Mk2
The Launchpad Mk2 is very similar to the Pro, except that it lacks velocity sensitivity and has fewer buttons outside the cue grid. For the most part you can follow the Launchpad Pro instructions above (ignoring the discussion of velocity sensitivity and aftertouch configuration), but refer to the button mapping shown for the Launchpad Mini and Launchpad S below, because the Launchpad Mk2 mapping uses the same arrangement of round buttons as those controllers.
Using Launchpad Mini and Launchpad S
These two controllers share the same mapping because they are functionally identical—the Mini is a highly compact version of the S. Neither supports velocity, and they have a very limited color palette, so the mapping does not attempt to reflect the Afterglow cue grid colors. Instead, colors are used to represent cue state.
The mapping of these controllers was made possible thanks to the kind loan of a Launchpad Mini for that purpose by Novation.
Launchpad Mini and S Cue Grid Colors
Pads which have no cues associated with them are dark. If the pad has a cue that is not running, it will be amber. If the pad’s cue conflicts with another cue that is running, it will be a dim amber. Cues which are running are bright green; cues which are ending blink red, as illustrated below.
The round buttons along the top are used to scroll around the grid, using the same conventions as the decals which come with the Launchpad Mini (and the arrows printed on the Launchpad S). The User 2 button can be used suspend and resume the Afterglow mapping. The round buttons on the right side are used to adjust the metronome, and start or stop the show, as shown:
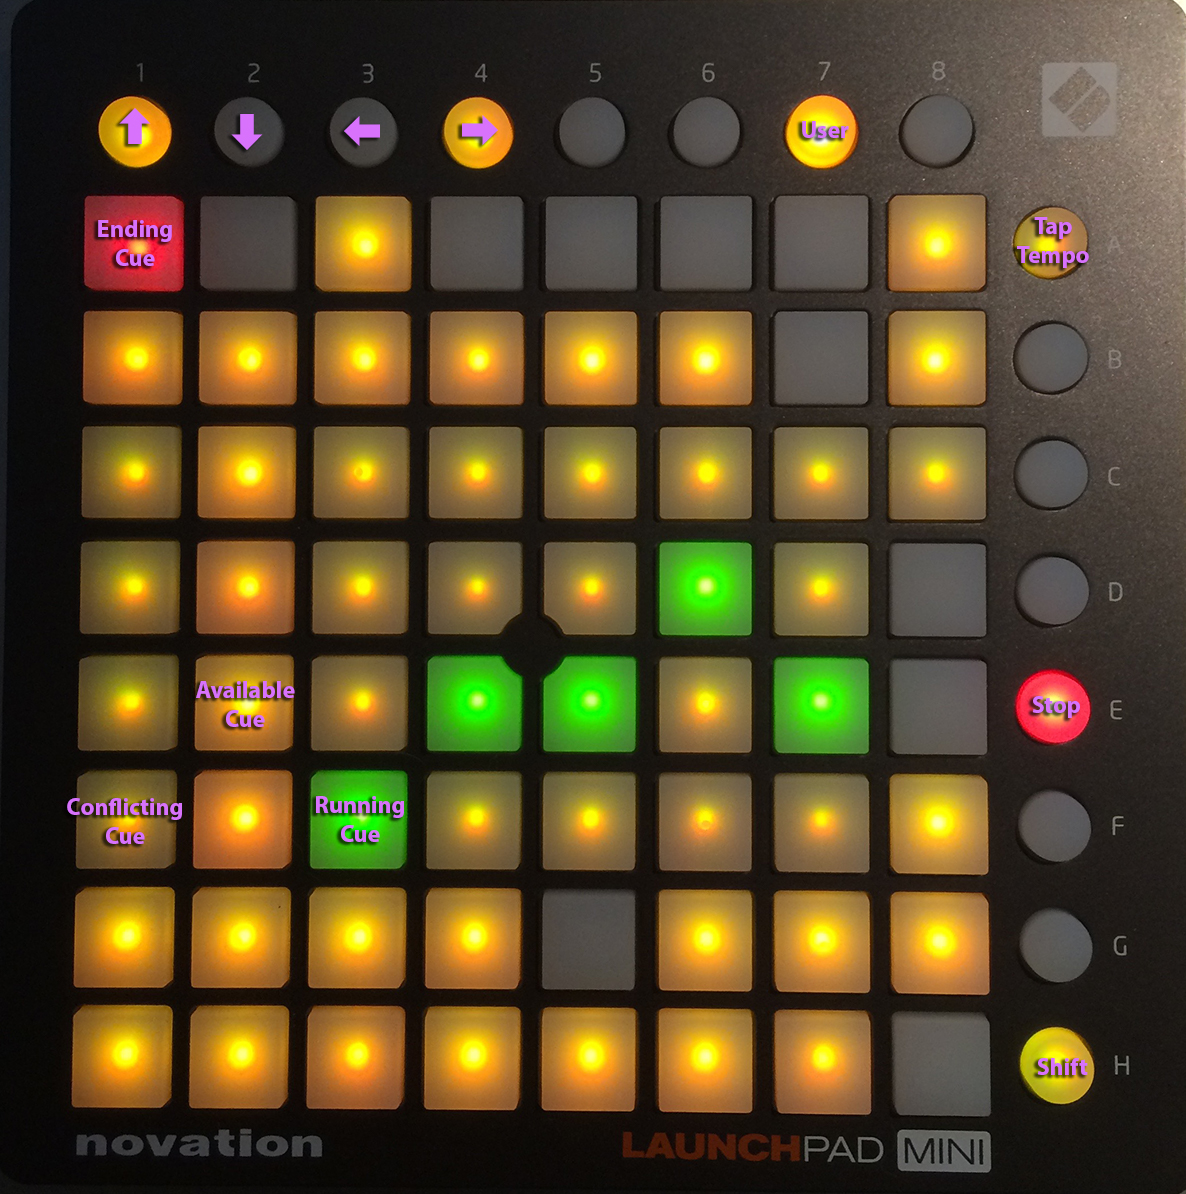
The Tap Tempo button corresponds to the button labeled Volume on the Launchpad S (and on the decal which comes with the Launchpad Mini), the Stop button matches the decal and printed label, and the Shift button corresponds to the Arm button. Although the locations of these buttons are different, they light up and respond as described in the Launchpad Pro instructions above.
Cues which run only while you hold them down will light up as bright amber instead of green while you are holding them, to let you know they will end as soon as you release the pad. As with other controller mappings, if you hold down the Shift button (the bottom right round button) while launching such a momentary cue, it will stay running even after you let it go, and in that case will be green.