Using Ableton Push
Some controllers have such rich capabilities that they deserve their own custom mapping implementations to exploit their capabilities as a show control interface. The Ableton Push is one, and a powerful mapping is being created. You can already use it to do most of the things that you would use the web interface for, and often with deeper control, since you can press multiple cue trigger pads at the same time, and they respond to variations in pressure.
| This page describes the mapping for the original Ableton Push. There is also a Push 2 mapping. |
Binding to the Push
Assuming you have an Ableton Push connected to the machine running Afterglow, Afterglow will find and activate it as soon as you have set up the sample show. You will see a brief startup animation, and Afterglow’s Push interface will start.
| For information about how to set up bindings without the sample show, or more details about how it works, see Setting Up Grid Controller Bindings. |
Here is an overview of how the Push mapping works:
Show Control
Once you have the Push linked to a show, it becomes a very direct and tactile way to monitor and control the cues and other aspects of the show.
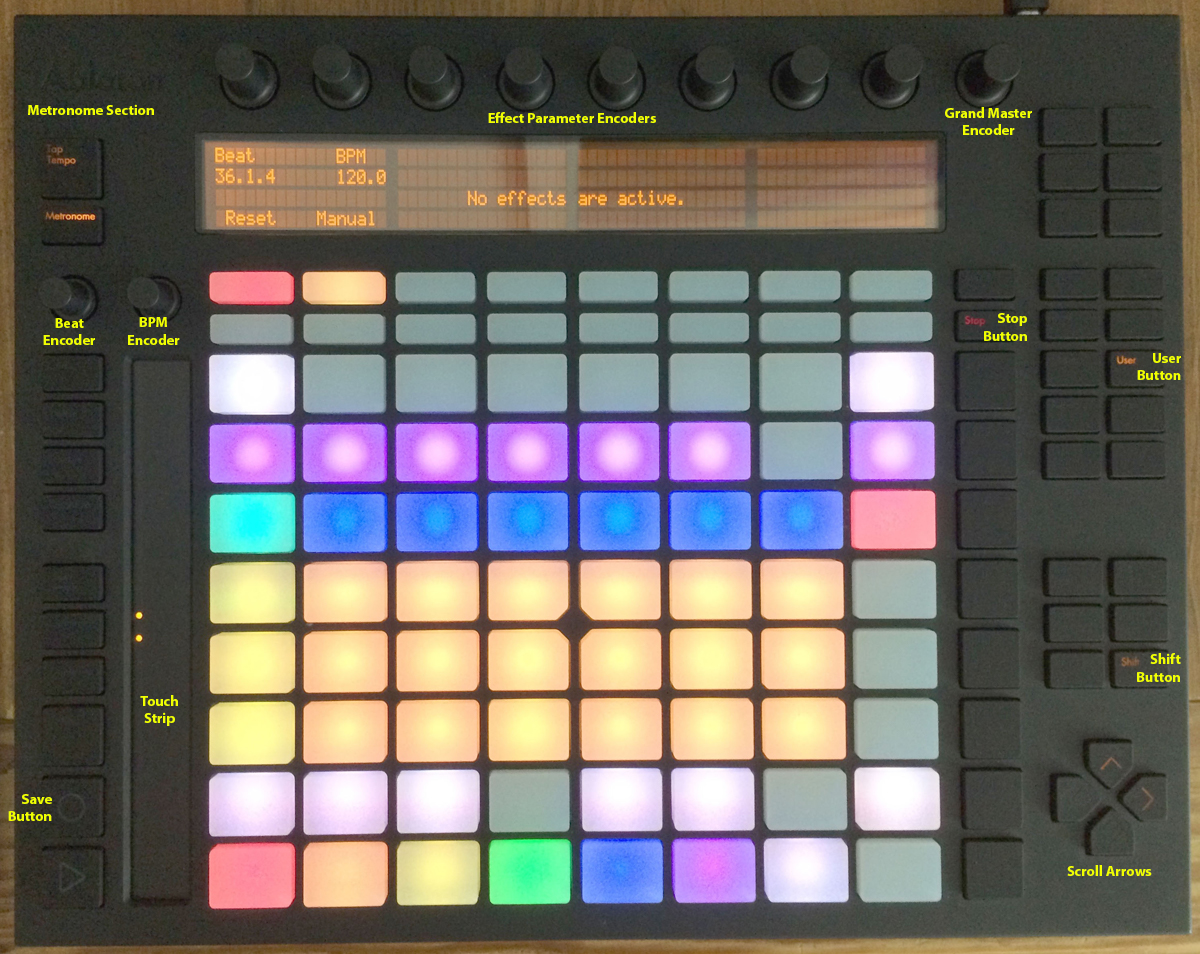
The text area at the top of the Push displays the effects currently running, and can optionally display metronome information as well. If a cue was defined with adjustable variables for its effect, they will also be displayed in the text area, and you will be able to adjust them by turning the encoder above the variable.
The rightmost encoder, past the text area, adjusts the show Grand Master, which controls the maximum brightness that any dimmer cue can achieve, so you can always use it to adjust the overall brightness of the show. As soon as you touch the encoder, the current Grand Master level will appear, and be updated as you turn the encoder. When you release it, the display returns to showing whatever it was before.
As with other numeric values that you can adjust, while you are adjusting the Grand Master, the touch strip on the left hand side of the Push will light up in the same proportion as the bar graph in the display, and you can touch or drag it to instantly set the value to whatever level you want.
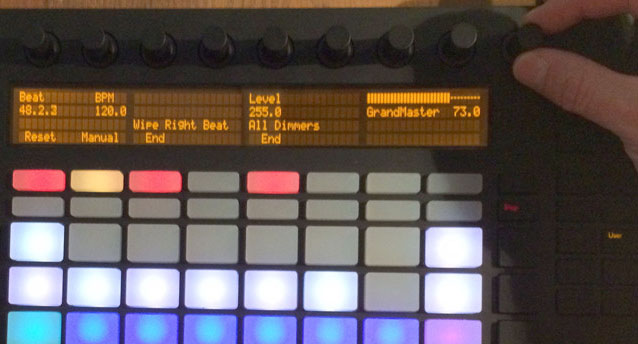
The red Stop button to the right of the top of the cue grid can be used to temporarily shut down the show, blacking out all universes that it controls, and suspending the processing of its effects.
Pressing it again restarts the show where it would have been had it not stopped.
Cues
Most of the space on the interface is dedicated to an 8×8 grid of color coded cue trigger pads, which provide a window onto the show’s overall cue grid. The Push can be linked to the web interface so that both always display the same section of the cue grid, and the web interface can remind you of the names of the cues you are looking at, or it can be scrolled independently, allowing you access to more cues at the same time.
| If you have more than one compatible grid controller, you can have Afterglow using all of them at the same time; each can be scrolled to different areas of the cue grid, and each can even be linked to a different browser window if you have that much screen space. |
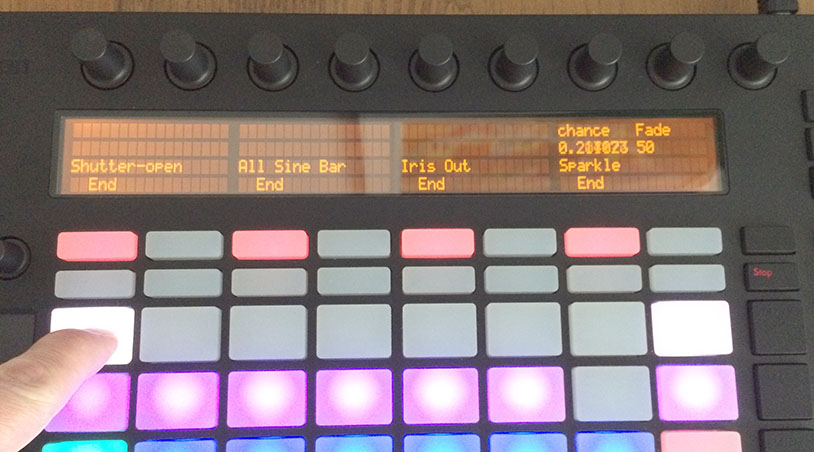
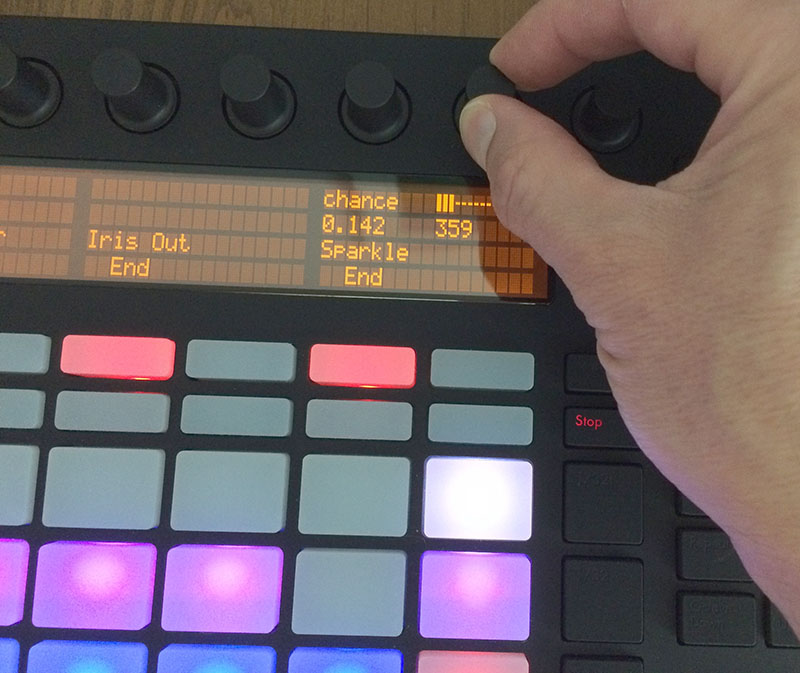
You can activate any cue shown by pressing its pad; running cues will
light up, and darken again when they end. The effects which cues
create will also appear in the text area above the cue pad, from left
to right, with the most recent effect on the right. In the photo
below, “Sparkle” is the most recent effect, and it has two
variables, chance and Fade, which can be adjusted by turning the
encoders above them. The chance value is changing rapidly because it
is configured to also be adjusted through the pressure sensitive cue
pad that was used to launch it.
To stop a running cue, press its pad again, or press the red End pad underneath its effect entry in the text area. Some cues will end immediately, others will continue to run until they reach what they feel is an appropriate stopping point. While they are in the process of ending, the cue pad will blink, and the End pad will be labeled Ending. If you want the cue to end immediately even though it would otherwise run for a while longer, you can press the blinking cue pad (or effect Ending pad) again and it will be killed right then.
The colors assigned to cue pads by the creator of the cue grid are intended to help identify related cues. Some cues (especially intense ones like strobes) are configured to run only as long as they are held down. In that case, when you press cue pad, it lights up with a whitened version of the cue color as a hint that this is happening, and as soon as you release the pad, the cue will end. If you want to override this behavior, you can hold down the Shift button (towards the bottom right of the Push) as you press the cue pad, and it will activate as a normal cue, staying on until you press it a second time.
As noted above, cues can also be configured to take advantage of the
pressure sensitivity of the Push cue pads, so that as you vary the
pressure with which you are holding down the pad, some visible
variable of the cue is altered. The strobe and sparkle cues in
created by
afterglow.examples/make-cues
for the sample show work this way: the intensity and lightness of the
strobe are increased by pressure, and so is the chance that a sparkle
will be assigned to a light on each frame. You can see these
variables change in the text area above the cue’s effect name while
you are adjusting them, as shown in the photo above.
Cues may be mutually exclusive by nature, and if they
were created to reflect this (by using the same keyword to register
their effects with the show, or specifying other effect keys in their
:end-keys list), when you activate one, the other cues which use the
same keyword are dimmed. This is a hint that when you activate one of
them, it will replace the others, rather than running at the same
time. In the photo below, the rest of the
Torrent 1 fixed gobo cues (the leftmost blue cues) are dimmed because
they would replace the running “T1 atom shake” cue.
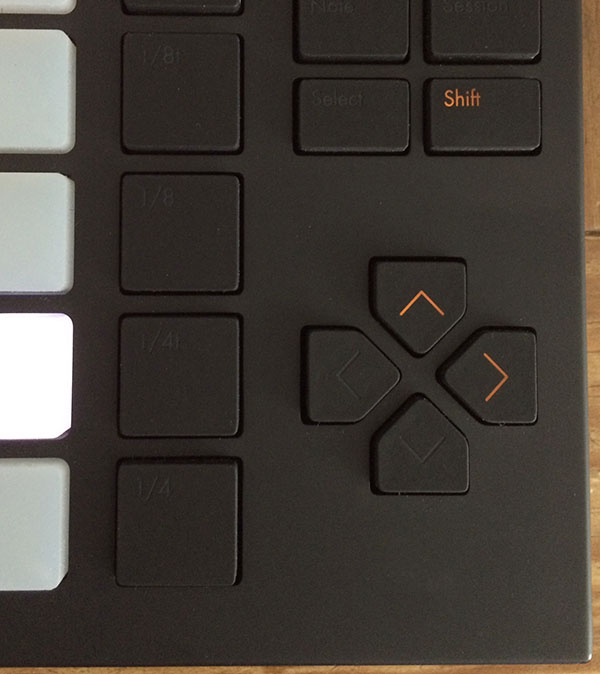
Scrolling
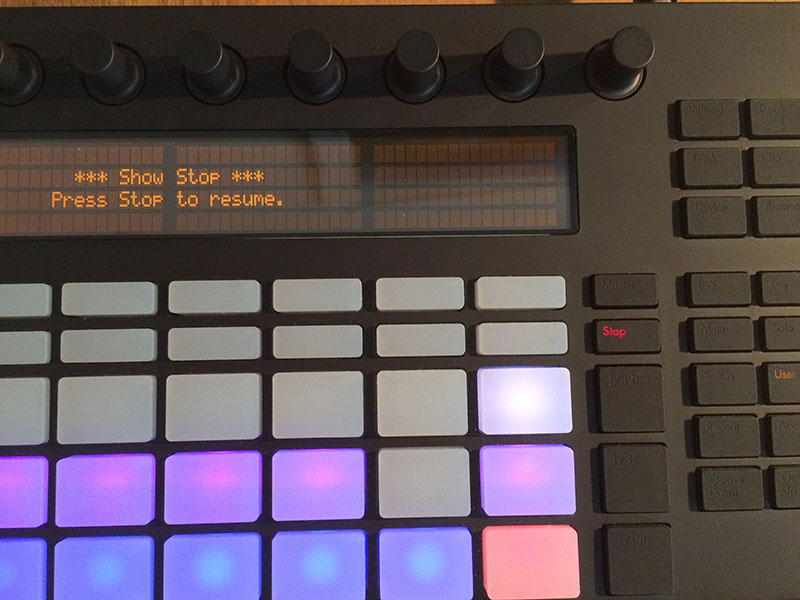
The show will likely have many more cues than fit on the pad grid; the diamond of arrow buttons at the bottom right allow you to page through the larger show grid. If there are more cues available in a given direction, that arrow will be lit, otherwise it is dark. Pressing an active arrow scrolls the view one “page” in that direction. In the photo below, it is currently possible to scroll up and to the right:
If you hold down the Shift button, the arrows gain a different purpose, allowing you to scroll the text display left and right, to see and adjust all of the currently running effects, even though only four at a time (or three, if the metronome section is showing) fit in the display. Pressing the left or right arrows scrolls the next group of effects in that direction into view; pressing the up arrow scrolls to the oldest (leftmost) effect, and pressing the down arrow scrolls to the most recent (rightmost) effect. While Shift is pressed, the arrows will light up according to whether they can scroll effects rather than cues in the corresponding direction.
Effect Control
As described above, the effects created by cues appear in the text display area, and can be scrolled through and ended by pressing the corresponding red End pad which appears underneath them.
Numeric Cue Variables
If the cue that created an effect has numeric variables assigned to
it, the variable names and values will appear above the effect name,
and they can be adjusted using the encoder knob above the variable.
For example, in addition to varying the sparkle chance variable
using the pad pressure, as was done above, its Fade variable can be
adjusted using the effect variable encoder above it. As soon as you
touch the encoder knob associated with a variable, a graphical
representation of the current value replaces its name, and updates as
you turn the encoder to change the value.
While you are adjusting the variable, the large touch strip on the
left hand side of the Push lights up to show you where you are in the
variable range, and you can touch and drag on the strip to instantly
set the variable to another value. Most numeric variables will have
values that grow from the bottom of the touch strip, but variables
marked as :centered, like Pan and Tilt variables, grow from the
center up or down.
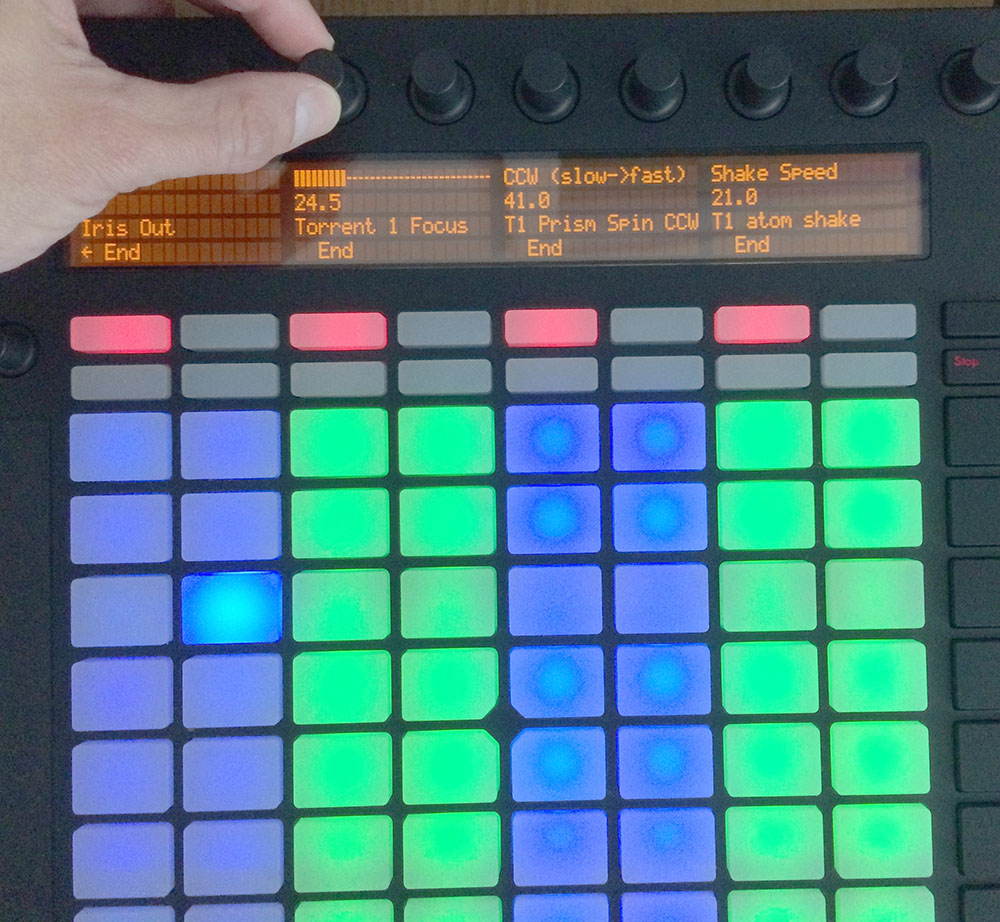
If an effect has only one adjustable variable, it will take up the entire effect area, and you can use either encoder to adjust it, as when adjusting a Focus function cue for the Torrent moving head spot:
When you release the encoder knob, the adjustment graph disappears, and the variable name reappears.
The ← indicator at the left of the text area in the above photo is an indicator that there are older effects which have been scrolled to the left, off the display. You will see → at the bottom right of the display when there are newer effects to the right. You can scroll to them using the Shift button with the scroll arrow buttons as described above.
This photo also illustrates the dimming of incompatible cues discussed
above: The leftmost columns of blue cues
all establish settings for the fixed gobo wheel of one of the Torrent
moving-head spots. Since one of them is active (the T1 atom
shake effect at the left of the text area corresponds to the
bright blue button three rows down the second column), the others are
dimmed to hint that pressing them would replace the active cue.
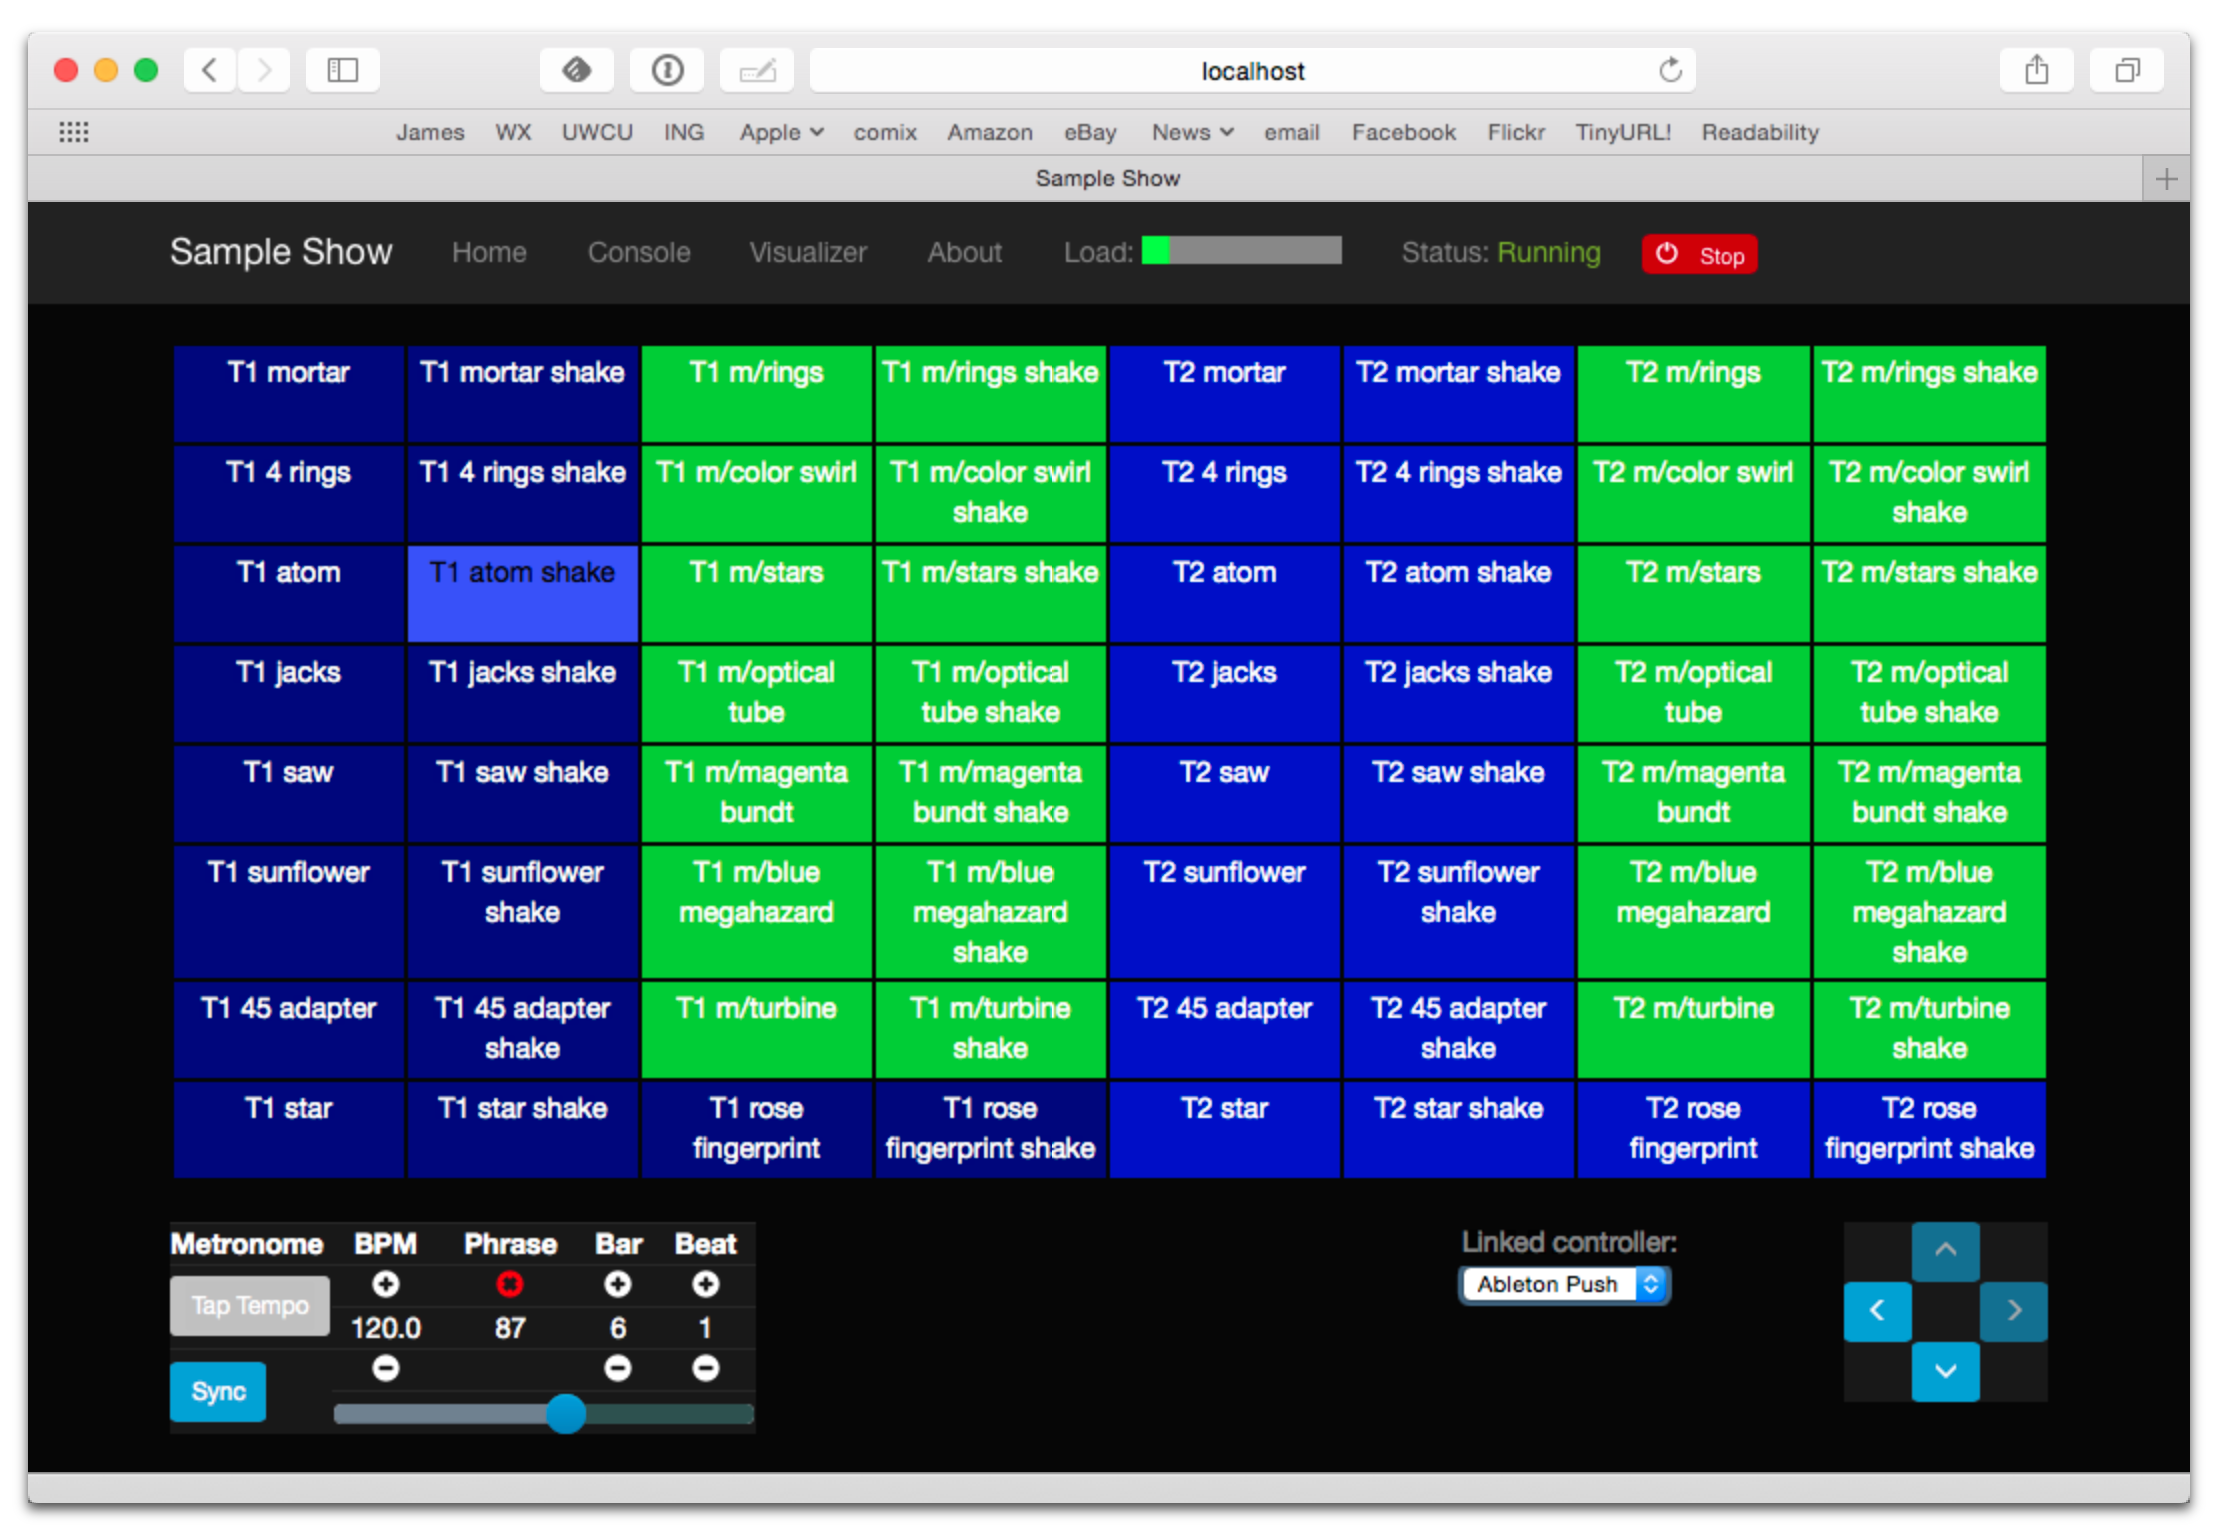
This dimming can also be seen in the web interface view of the cue grid:
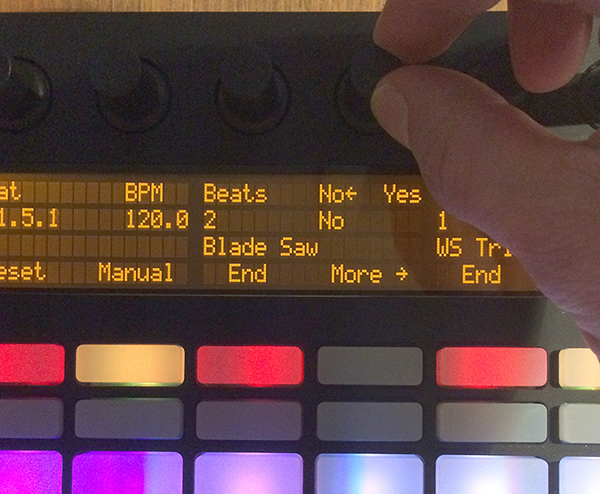
Boolean Cue Variables
If a cue has Boolean variables assigned to it, they will also appear
above the effect name, with the current value showing as Yes or
No. To adjust them you also start by grabbing the closest encoder,
at which point you will see the two options with an arrow pointing at
the currently-chosen one. Rotate the encoder towards the option you
want to choose and the variable will be updated:
When you release the encoder knob, the choices disappear and the variable name reappears.
You can also use the touch strip when setting a Boolean variable;
touching the top half sets it to Yes, while the bottom half sets it to
No.
Color Cue Variables
If a cue has color variables assigned to it, they will also appear above the effect name. The currently assigned color value will be displayed as a six digit hexadecimal number, representing the eight bit red, green, and blue representation of the color value, #rrggbb. In this photo, a cue with a color variable that starts out white has just been launched:

When an effect is displaying a color cue variable, touching the associated encoder will open up a special color selection interface, which takes over the entire cue grid, as well as the effect cell:
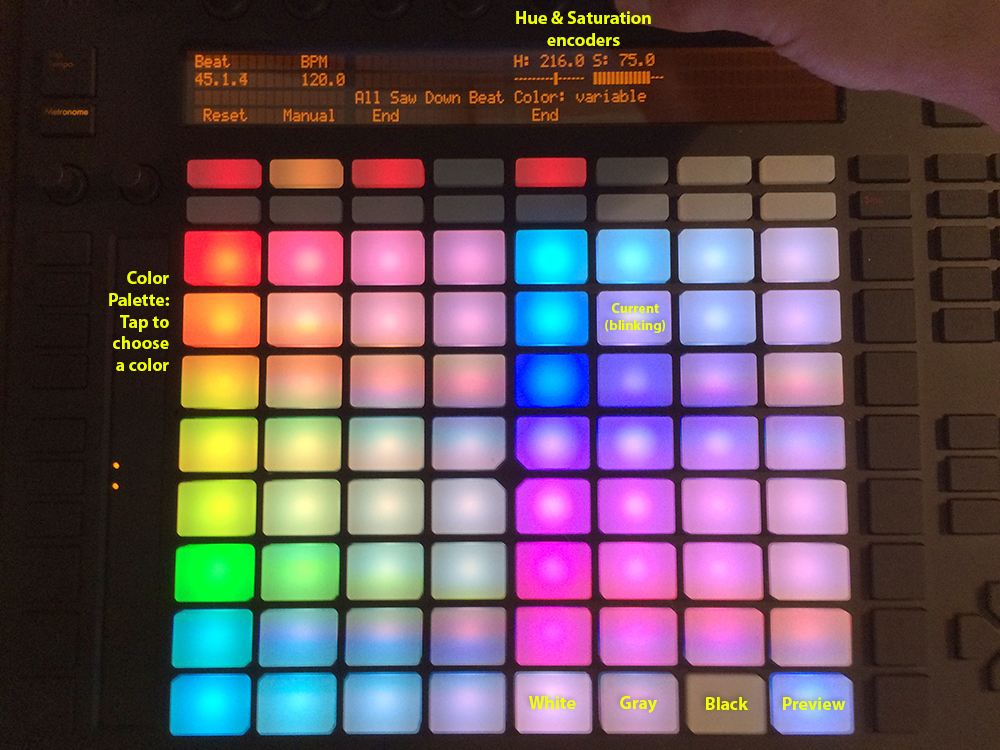
In addition to adjusting the color’s hue and saturation using the encoders above the effect, you can instantly jump to a color by tapping any of the pads in the grid, which form a palette of four saturation levels of hues spread across the rainbow. The four pads on the bottom right let you select white, medium gray, and black as color values as well, and the last pad displays a preview of the currently selected color, rather than doing anything when you press it.
If any pad other than the preview pad matches the currently selected color, it blinks (regardless of whether you chose that color by pressing the pad or by turning the encoders).
While you are holding the hue or saturation encoder, you can also use the touch strip to see and jump to any value in that encoder’s range. If both encoders are being held, the touch pad allows you to select saturations, since the touch pads already give you an easy interface for selecting hues.
As soon as you let go of both the hue and saturation encoders, the palette disappears and the normal cue grid returns.
Scrolling Through Cue Variables
If a cue has more than two variables, even though you can only see two at a time on the Push, you can still check and adjust all of them. Whenever there are too many to fit, the rightmost pad just below the effect display will be lit with an amber color and labeled More → as shown below:
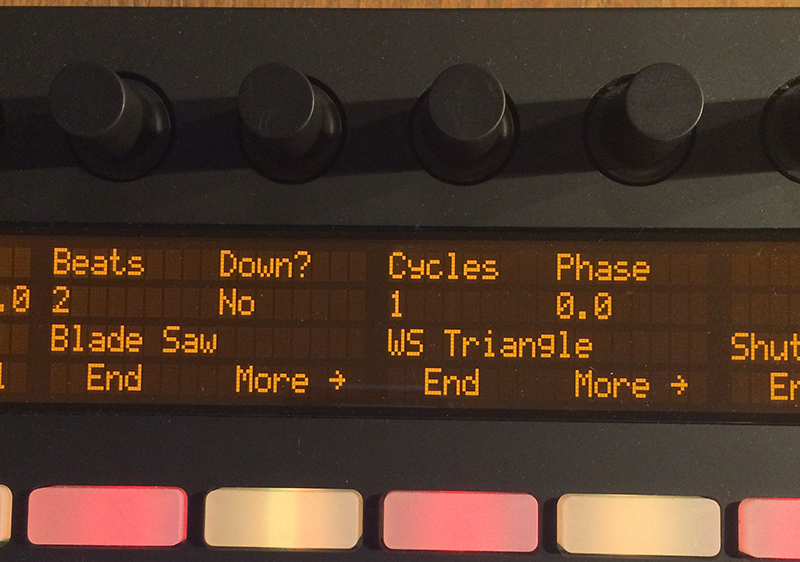
Each time you press the More → button, you will see the next two variables assigned to the cue. Once you reach the end of the list, it wraps back to the beginning. Grabbing an encoder above the variables will adjust whichever variable is currently displayed beneath it. (While you are holding encoders to adjust an effect’s variables, its More → button will be blacked out and disabled.)
Saving Cues
If you have made any adjustments to cue variable values, these are normally discarded when you end the cue; the next time it begins, it starts with the values that were configured in the show. You can change that by saving the cue’s variables. To begin, hold down the ◯ button near the bottom left of the Push:
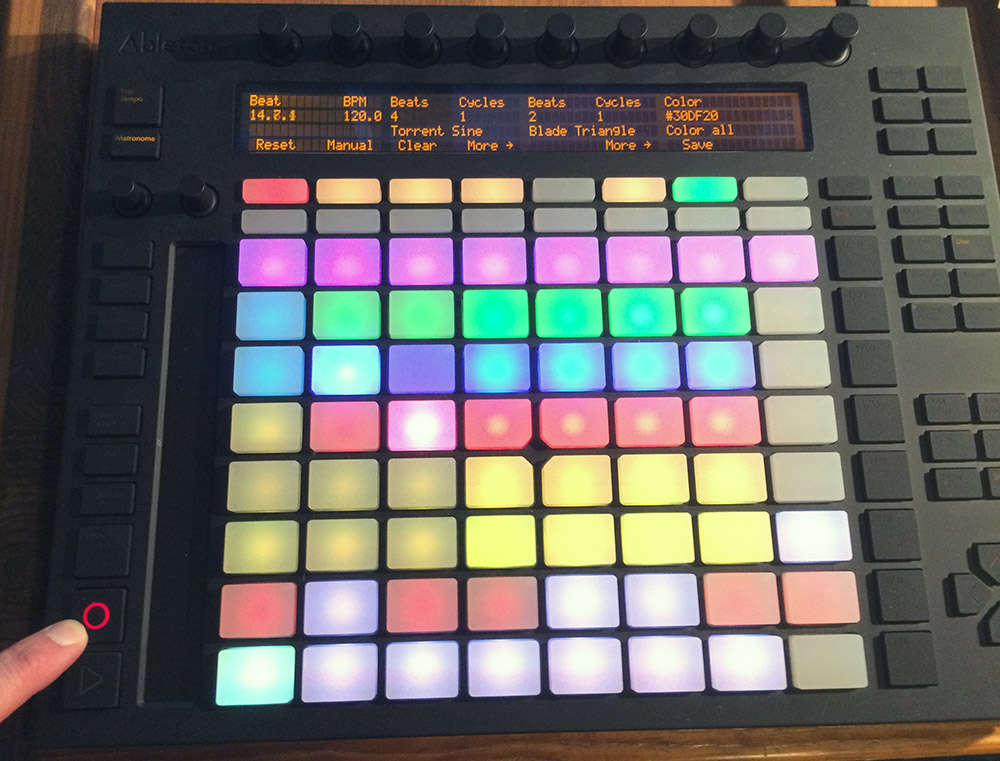
While this button is held down, the red End buttons beneath the
effect list disappear, and are replaced with the cue saving interface.
If you have made any adjustments to a cue’s variables since it was
started, a green Save button will appear (like the one beneath
the Color all effect in the photo above). Pressing that will save
the adjustments you made, so the next time you launch the cue, the
adjusted values will be used.
When you save a color cue that is configured like the ones in the sample show, the color of the cue’s pad in the cue grid is updated to reflect the new color you have chosen. (Its color in the the web interface cue grid is updated as well).
Once you have saved a cue’s variables, while it is running, instead of
a green Save button, you will see an amber Clear button
(like the one beneath the Torrent Sine effect in the photo).
Pressing that will remove the saved values, so the cue goes back to
its original configuration.
If you save a cue’s variables, and then adjust them further, the Save button returns, allowing you to save your new values. If you don’t, the values you saved earlier will be used the next time you start the cue.
If a cue’s variables have neither been saved nor adjusted, no
Save or Update button appears (like for the Blade
Triangle effect in the photo). Of course, while saving cues, you can
still scroll though their variables using the More →
buttons.
Once you release the ◯ button, the save interface goes away, and the effect End buttons return.
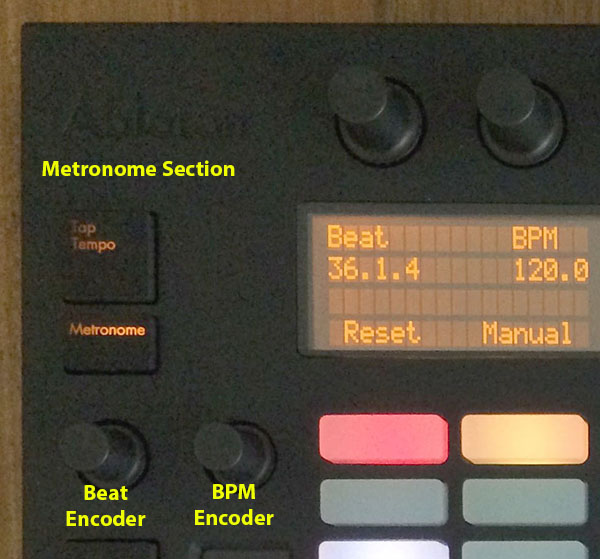
Metronome Control
The top left section of the Push lets you view and adjust the Metronome that the show is using to keep time with the music that is being played. Since Afterglow’s effects are generally defined with respect to the metronome, it is important to keep it synchronized with the music. When active, the metronome section takes over the leftmost quarter of the text area (so there are room to see only three effects, rather than the normal four). To toggle the metronome section, press the Metronome button. It will appear if it was not showing, and disappear if it was there. The Metronome button is lit more brightly when the section is active.
The metronome section shows the current speed, in Beats Per Minute, of the metronome, and the Tap Tempo button label flashes at each beat (this flashing happens regardless of whether the metronome section is visible in the text area). The metronome section also shows you the current phrase number, the bar within that phrase, and the beat within that bar which has been reached.
The most basic way of synchronizing the metronome is to tap the Tap Tempo button at each beat of the music. Tapping the button aligns the metronome to a beat, and if you tap it three or more times within two seconds of each preceding tap, sets the metronome’s BPM. Tap it as you hear each beat of the music, and after three or more taps, the speed of the metronome will be approximately synchronized with the music.
Once the tempo is correct, you can tell Afterglow which beat is the down beat by holding down the Shift button while pressing Tap Tempo. This combination does not change the tempo, but tells Afterglow that the moment when you tapped the button is the down beat (the first beat of a bar).
You can also adjust the BPM by turning the BPM encoder, which is the rightmost encoder below the Metronome button:
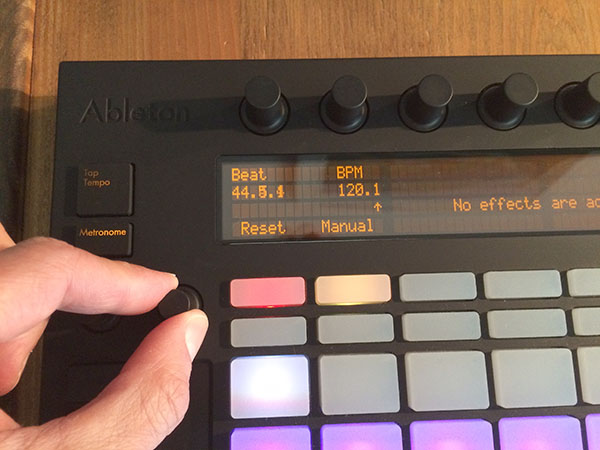
While you are holding this encoder, the symbol ↑ appears below
the BPM value as a visual reminder of what value you are adjusting.
Turning the encoder clockwise raises the BPM, turning counterclockwise
lowers it. While the metronome section is showing, you can also use
the encoder above the BPM value to adjust it. But you can grab the
dedicated BPM encoder below the Metronome button even when the
metronome section is not showing, and it will appear while you have
the encoder in your hand, so you can adjust the BPM quickly, and then
get back to what you were doing.
If you press the Shift button, the BPM encoder can be used to
adjust the BPM by whole beats rather than tenths. While Shift is
down, the ↑ will point to the left of the decimal point
rather than to the right of it, and the BPM will change ten times as
quickly as you turn it. You can switch back and forth in the middle of
your adjustments by pressing and releasing the shift key at any time.
In order to make longer chases and effects line up properly with the
music, you will also want to make sure the count is right, that the
beat number shows 1 on the down beat, and that the bar numbers are
right as well, so that the start of a phrase is reflected as bar
number 1. In addition to using Shift with Tap Tempo to
set the down beat, you can adjust the current beat number using the
beat encoder, the leftmost encoder below the metronome button:
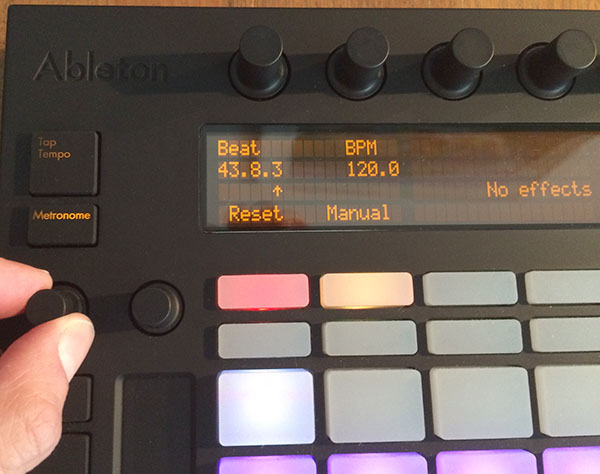
While you are holding this encoder, the symbol ↑ appears
below the beat number as a visual reminder of what value you are
adjusting. Turning the encoder clockwise jumps to the next beat,
turning counterclockwise jumps back to the previous one. As a tactile
reminder that you are adjusting whole beats, this encoder moves with a
distinct click as it changes value, while the BPM encoder turns
smoothly as you scroll through fractional BPM values.
While the metronome section is showing, you can also use the encoder above the Beat value to adjust it. But you can grab the dedicated Beat encoder below the Metronome button even when the metronome section is not showing, and it will appear while you have the encoder in your hand, so you can adjust the beat number quickly, and then get back to what you were doing.
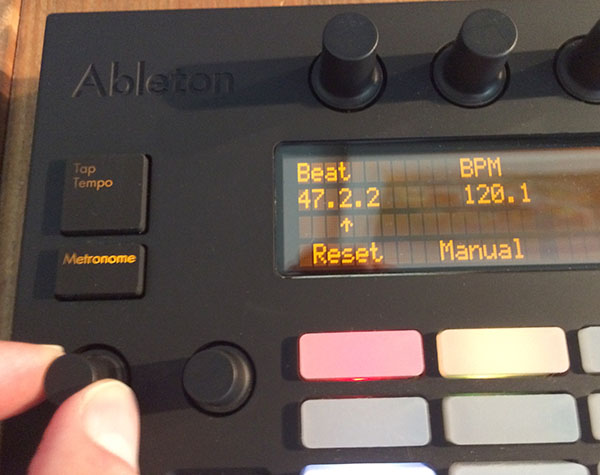
If you press the Shift button, the Beat encoder can be used to
adjust the current bar within the phrase instead of the current beat.
While Shift is down, the ↑ will point at the bar
instead of the beat, and turning the encoder will jump that value
forwards or backwards:
If you know a phrase is about to begin, you can press the red Reset pad in the metronome section right as it does. This will reset the count to Phrase 1, Bar 1, Beat 1.
Trying to keep up with tempo changes during dynamic shows can be
tedious, so you will hopefully be able to take advantage of
Afterglow’s metronome synchronization features. If the DJ can send you
MIDI clock pulses, or you can
connect via a Local Area Network to Pioneer professional DJ gear to
lock into the beat grid established by
Pro DJ Link, Afterglow can
keep the BPM (with MIDI) and even the beats (with Pro DJ Link and the
Traktor Afterglow Beat Phase
controller mapping)
synchronized for you. The Sync pad in the Metronome section (showing
Manual sync in these photos) will eventually allow you to set this
up, but that is not yet implemented, so for now you will need to use
the web interface to configure it.
| The pad does already change color to let you know the sync status: amber means manual, green means successful automatic sync, and red means a requested automatic sync has failed. It is likely that a future release of Afterglow will let you press this pad to choose your sync source. |
Once your sync is established, the meaning of the Tap Tempo button changes. If you are using MIDI clock to sync the BPM, it becomes a Tap Beat button, which simply establishes where the beat falls. If you are locked in to a Pro DJ Link beat grid or using the Traktor beat phase mapping, the beats are automatically aligned for you so, it becomes a Tap Bar button which, when pressed, indicates that the current beat is the down beat (start) of a bar. (Similarly, if you press the metronome Reset pad while synced to a Pro DJ Link beat grid or Traktor beat phase, the beat itself will not move, but the beat closest to when you pressed the pad will be identified as Beat 1.) In these sync modes you can also use the Shift button to align at the next bigger boundary: If tapping would normally move the bar, shift-tapping will move the phrase.
If you try to adjust the BPM encoder while sync is active, it will have no effect, and Afterglow will point at the sync mode to explain why it is ignoring your adjustments.
Sharing the Push
If you are using Afterglow at the same time as Ableton Live, you can switch back and forth between which has control of the Push by pressing the User button. If Live is not running when you press User, the Push interface will simply go blank (except for the User button itself), until you press it again, at which point Afterglow will light it up.
| Future releases may take advantage of more of the buttons on the controller. |